El trabajo de escribir este detallado artículo se lo ha tomado Brian Jackson, para promocionar su plataforma Kinsta. Que su propia web solo obtiene una valoración de Google de 45/100 (hoy, 12, de enero, 2017), no es más que una anécdota graciosa y en mi opinión este artículo servirá a cualquiera que se ponga a optimizar su sitio para Google Page Speed a mano.
How Important is Google PageSpeed Insights?
Google PageSpeed Insights is a web performance tool created by Google to help you easily identify ways to make your site faster and more mobile-friendly, by following recommendations on best web practices. A very important thing to remember though is that you shouldn’t always obsess over scoring 100/100. This might not even be possible in all scenarios, depending upon how your WordPress site is setup. With a lot of multipurpose themes and sites with dozens of external scripts, you simply will have an almost impossible time trying to achieve a perfect score. Which is perfectly OK.
We recommend looking at the speed of your site, more than the scores. Scores with tools like Pingdom, GTMetrix, and Google PageSpeed Insights can sometimes lead you astray. Especially since some of them don’t even support HTTP/2 yet. What really matters is ensuring your site loads fast and that the perceived performance is also up to par. Perceived performance is how fast your website feels like it loads to users.
Does Google use PageSpeed Insights when it comes to SEO and the page speed ranking factor or pure response speed? This was an interesting question brought up by an SEO over at FDP Group Leeds and discussed on Search Engine Roundtable. Gary Illyes, Webmaster Trends Analyst for Google, responded with saying “I’ll go with both.”
This is partialy due to the fact that in most cases when you have a slow website, you are most likely going to have a lot of warnings in Google PageSpeed Insights. A lot of the recommendations go hand in hand with how they relate to your pure response times. They don’t always correlate 100%, but what Gary is most likely saying is that if you have a slow website, yes, it probably will affect your rankings.
Scoring 100/100 on Both Shared Hosting and Kinsta
We thought it would be fun to explore the new Twenty Seventeen theme in WordPress 4.7. This is the first default WordPress theme that is aimed at businesses instead a typical blog, which is exciting! So today we are going to show you how to score that perfect 100/100 on both Desktop and Mobile. We have installed common tools and services that many WordPress sites use, such as Google Analytics, Akismet, Yoast SEO, etc. We ran tests on both a low-budget shared host and on Kinsta to show you just how much difference there can be when it comes to fine-tuned Google Cloud hosting vs a shared hosting environment.
While this is a small site, it is a good foundation to at least understand a little bit about how Google PageSpeed Insights works. If you are interested in seeing some optimizations on a larger multipurpose theme, check out our post on optimizing the Total WordPress theme.
100/100 in Google PageSpeed Insights with Shared Host
Our first test site, we have WordPress 4.7 with the Twenty Seventeen Theme running on a popular low-budget shared host (Apache). SSL is configured and the following plugins are installed.
- Yoast SEO
- Akismet
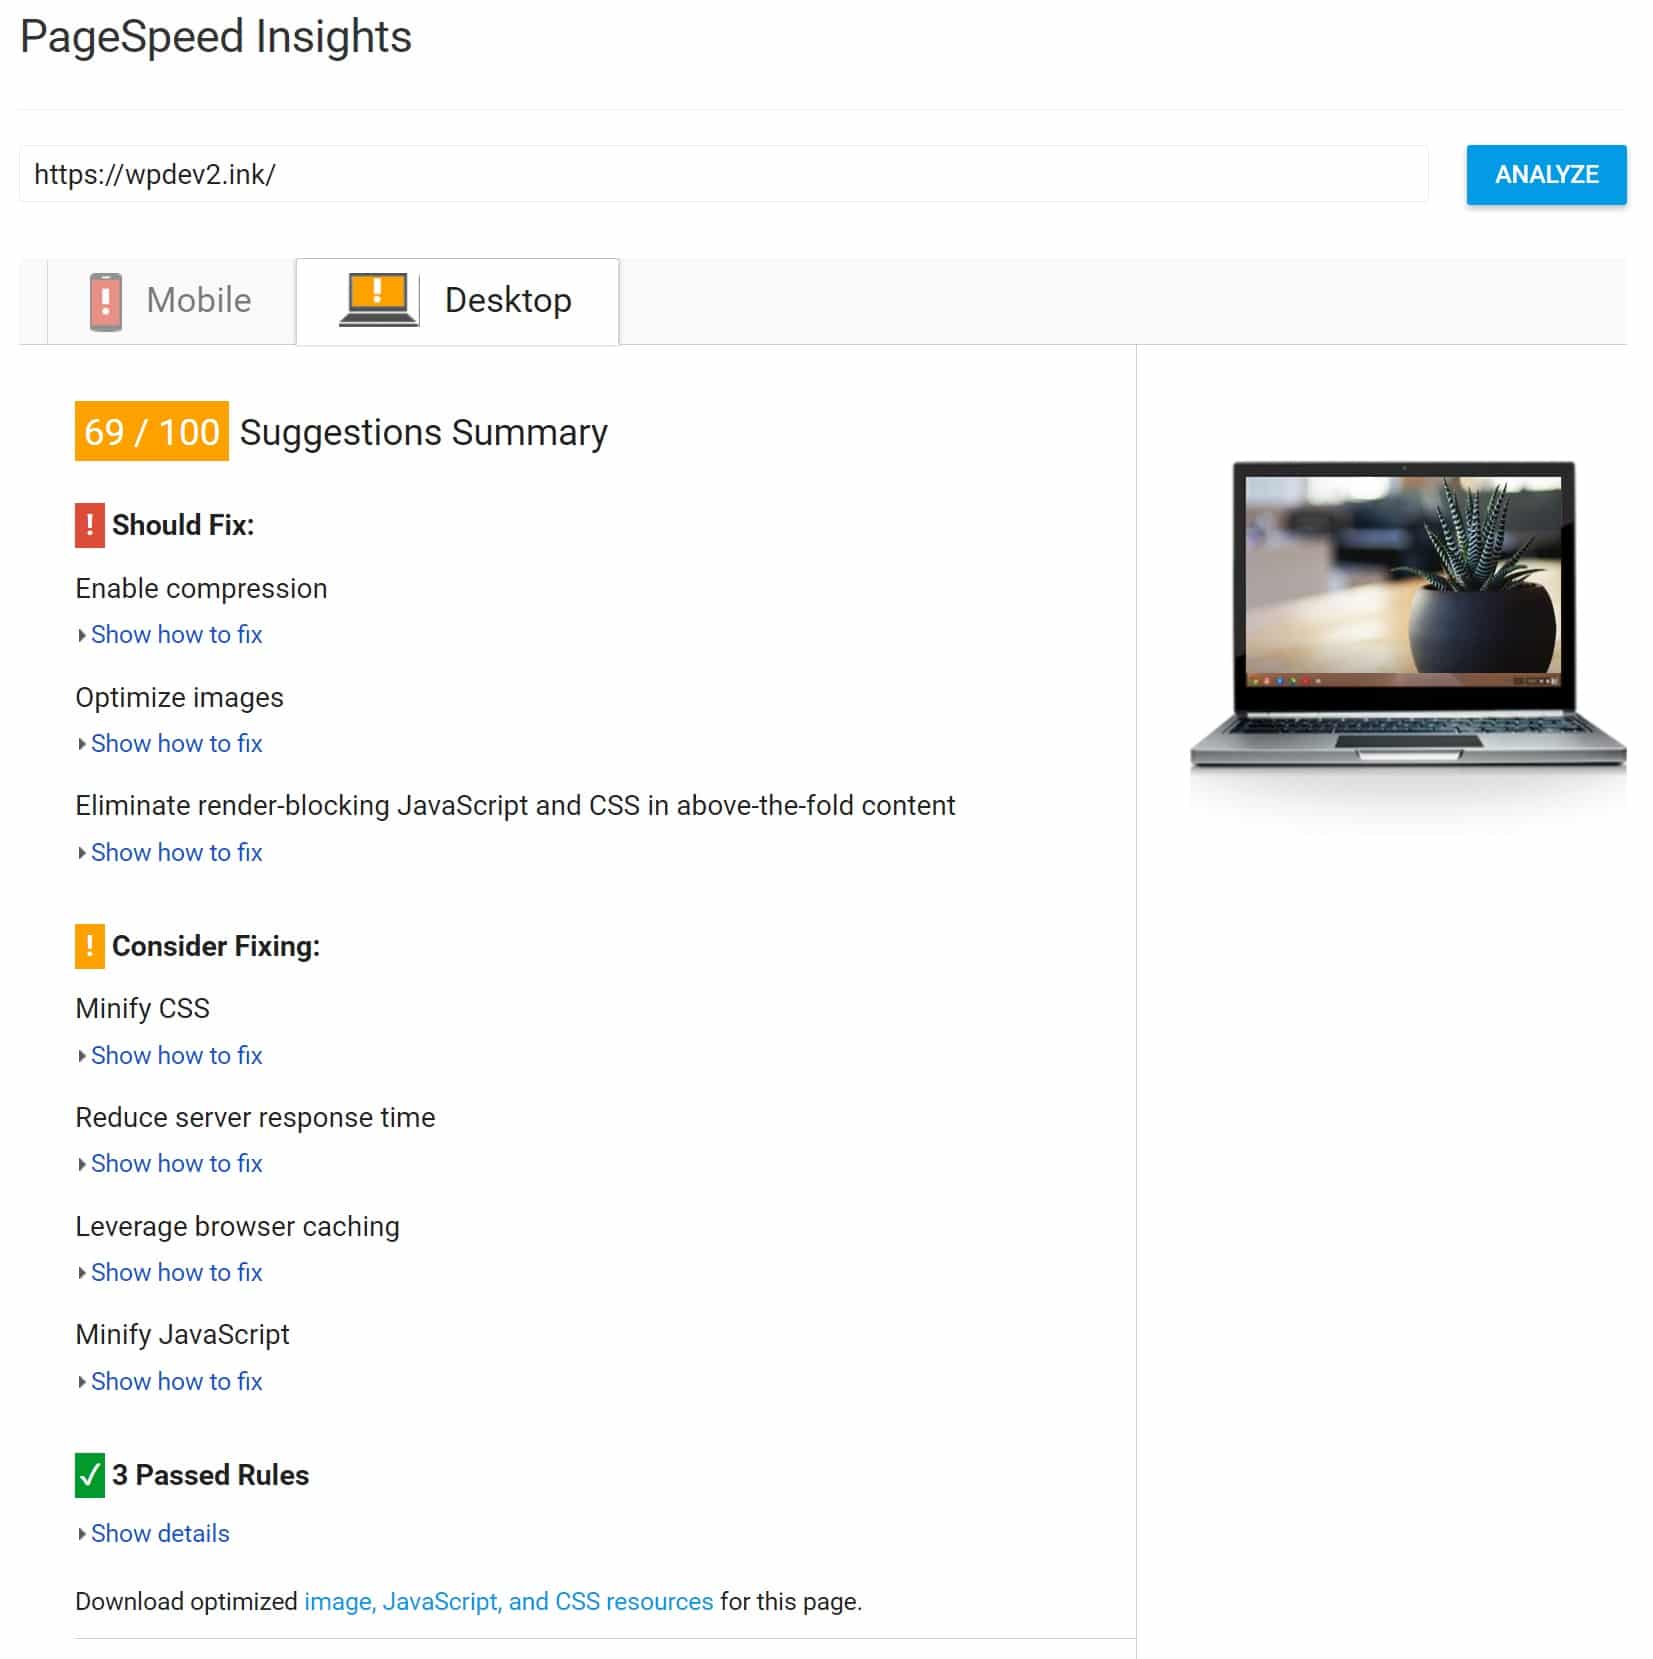
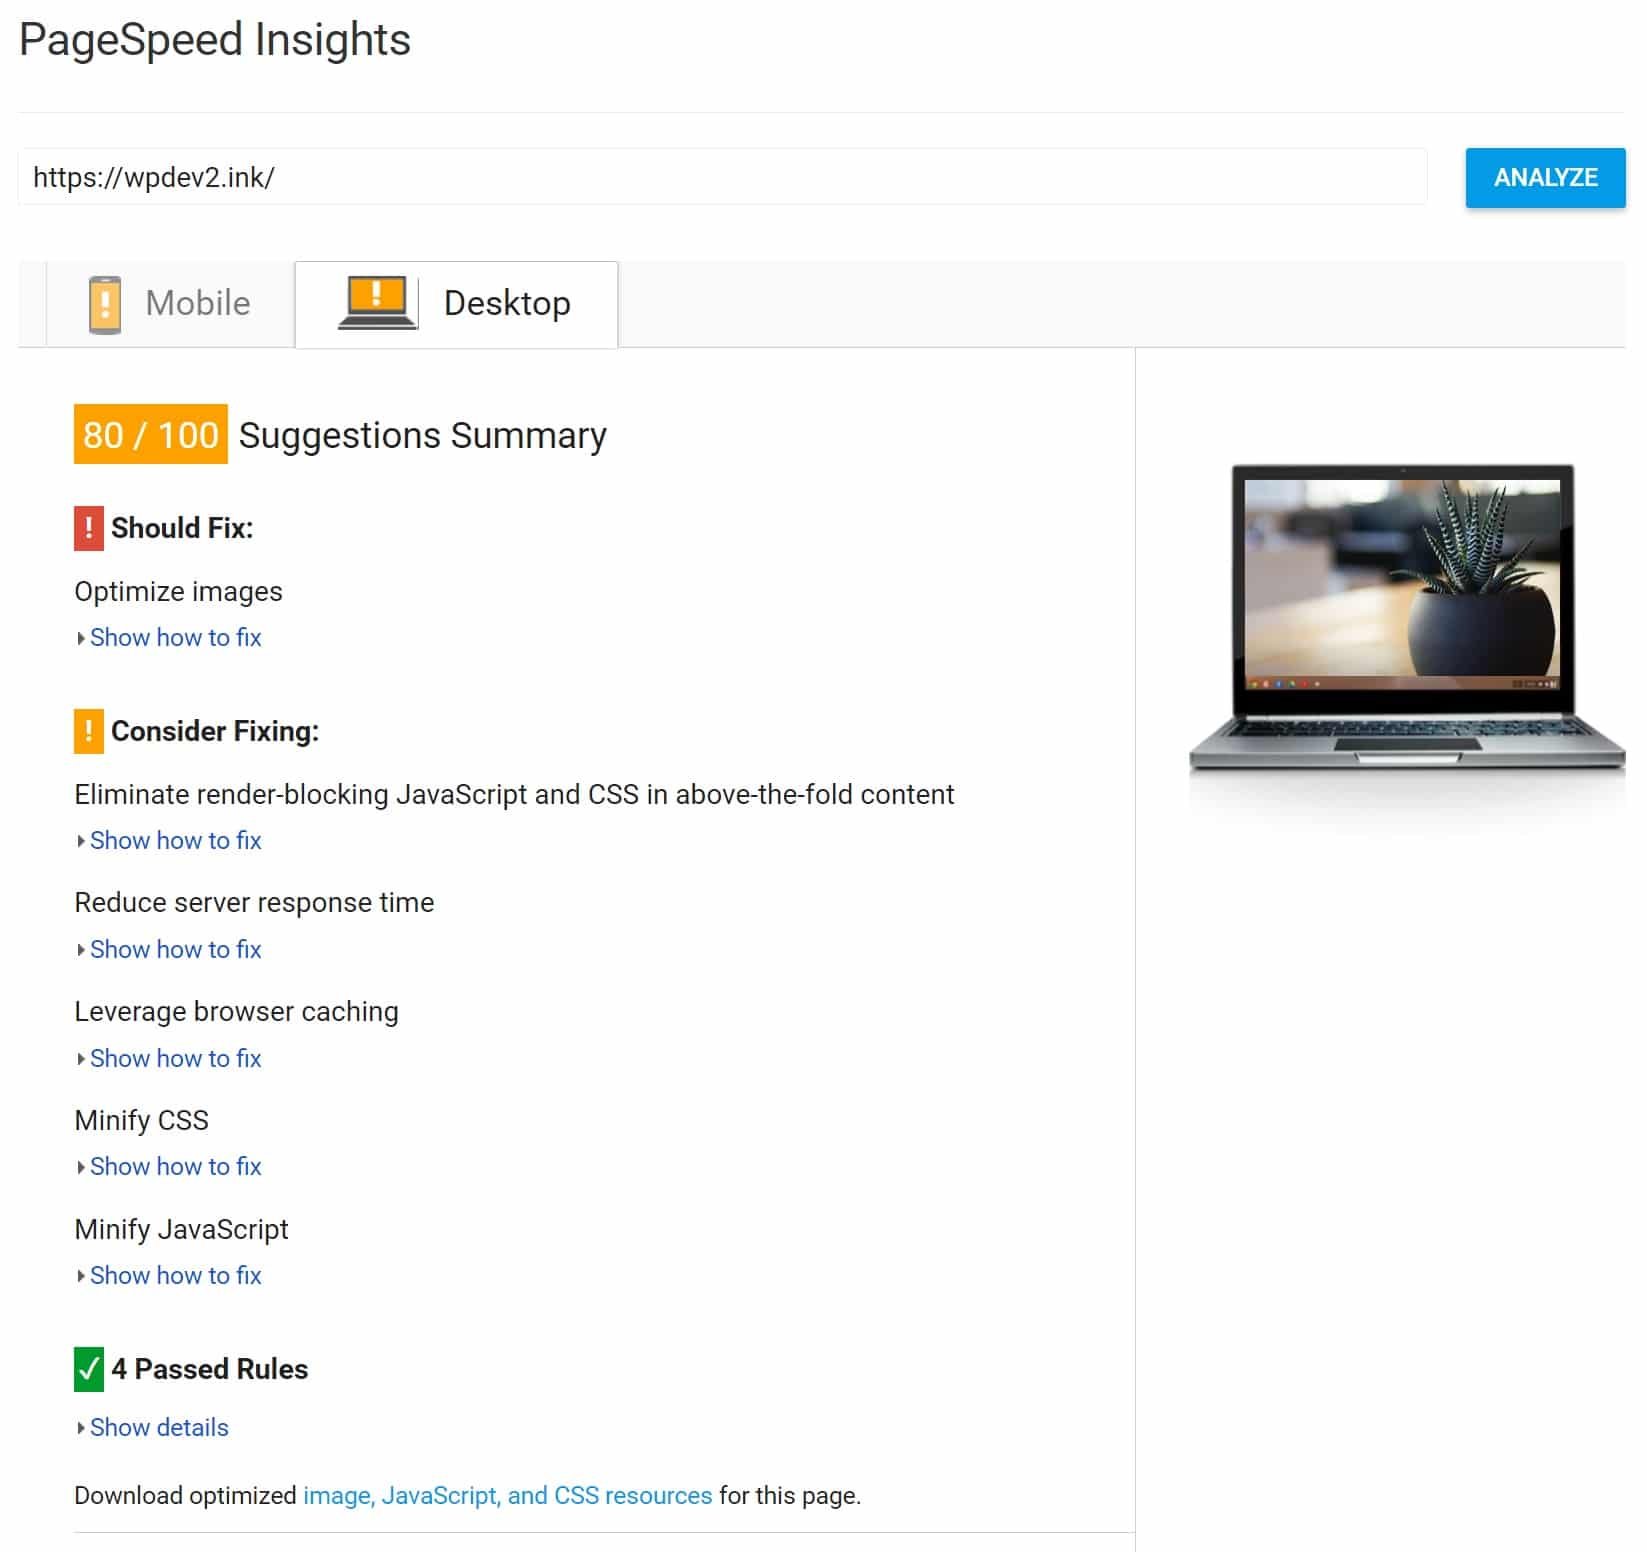
We also have Google Analytics running within the <body> of our header.php file. The only modification we have made is we added a featured image to the default dummy “Hello world!” blog post. We run our test site through Google PageSpeed Insights and out of the box, we get a 69/100 desktop score and a 58/100 mobile score. So we definitely have some improvements that should be made here. Let’s dig through each one of these to see how we can fix them.
Enable Compression
We will start with desktop first as many of the fixes will also apply for mobile. The very first Google PageSpeed Insights recommendation that we need to fix is the Enable Compression warning.
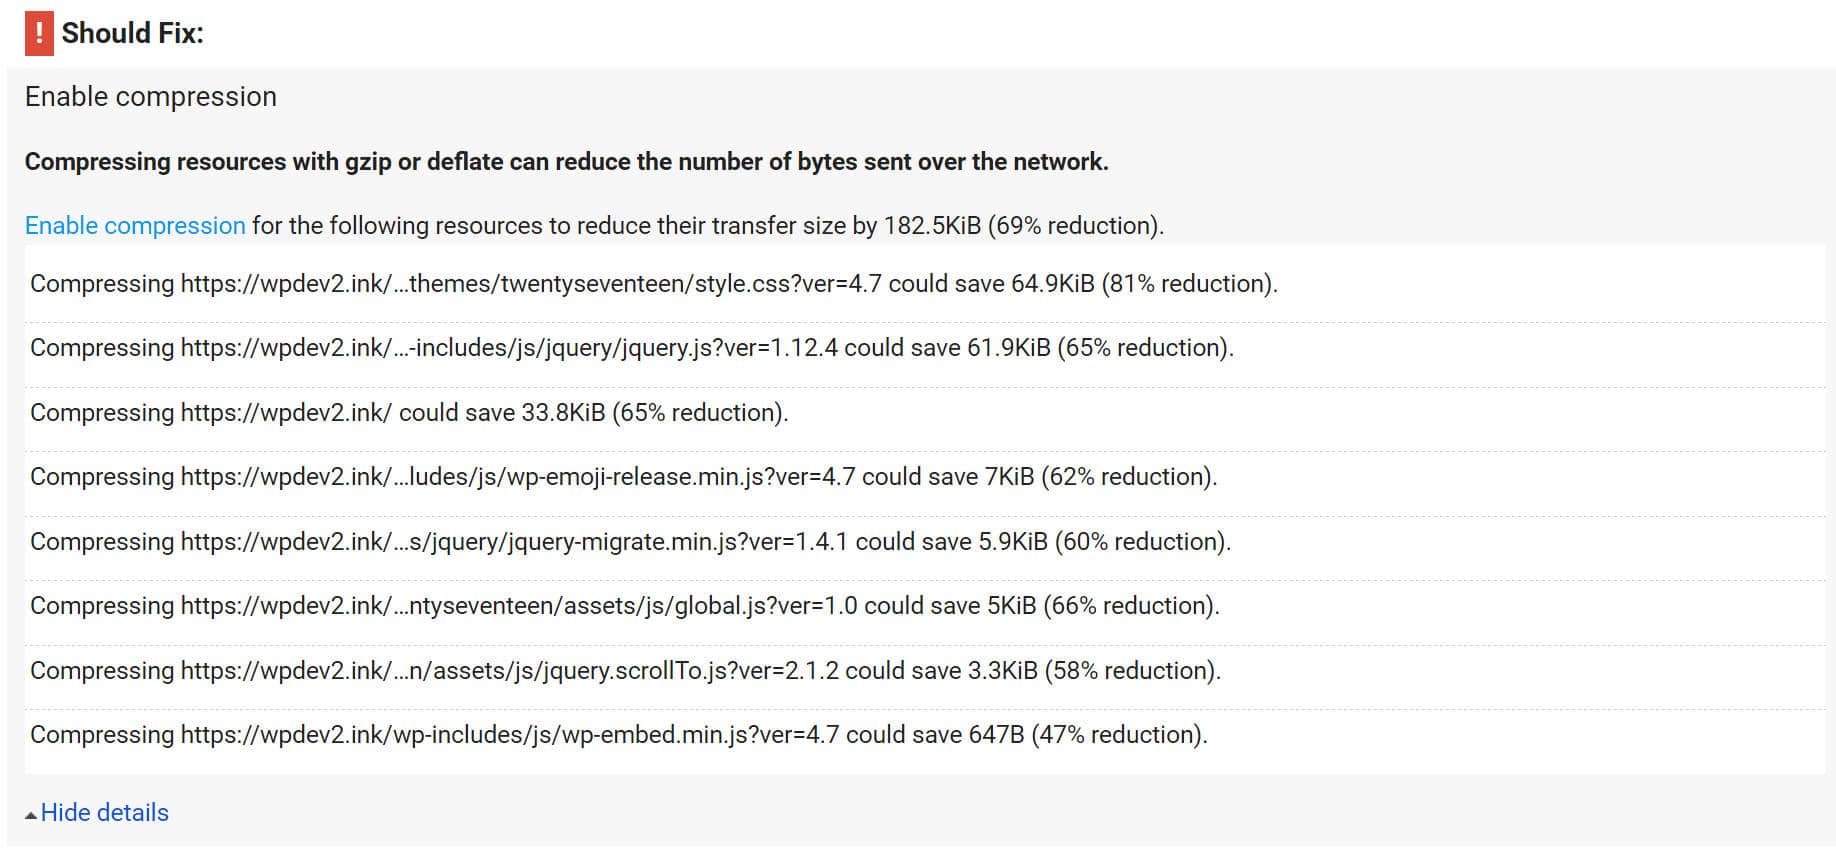 According to Google, to fix this we need to enable Gzip compression. Unfortunately the shared host doesn’t have this automatically enabled already on their servers, so we have to do it manually.
All modern browsers support and automatically negotiate
Gzipcompression for all HTTP requests. Enabling Gzipcompression can reduce the size of the transferred response by up to 90%, which can significantly reduce the amount of time to download the resource, reduce data usage for the client, and improve the time to first render of your pages.
There are a couple ways you can go about doing this. The first, and one of the easiest is by using a caching plugin that supports enabling Gzip. WP Rocket for example adds Gzip compression rules in your .htaccess file automatically using the mod_deflate module. W3 Total Cache also has a way to enable this for you under it’s performance section.
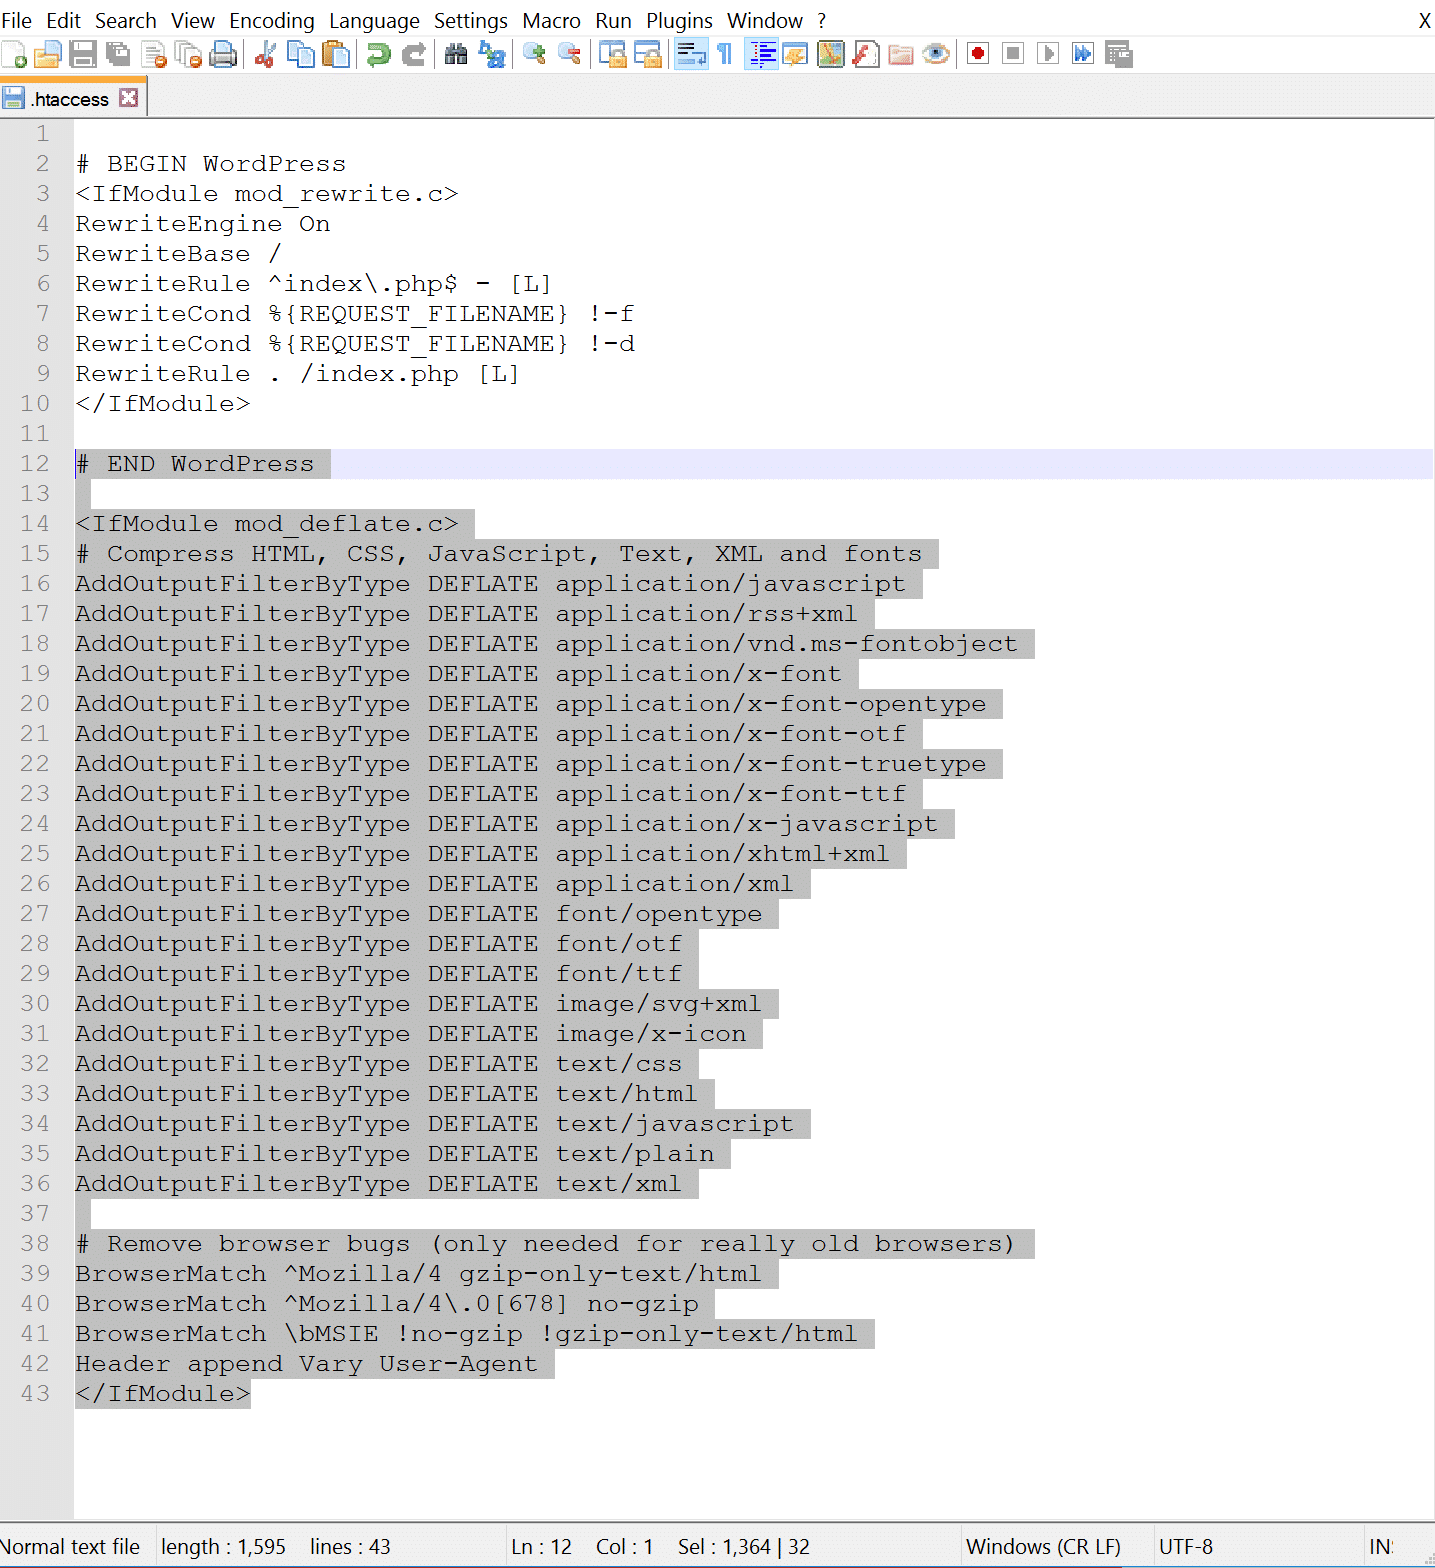
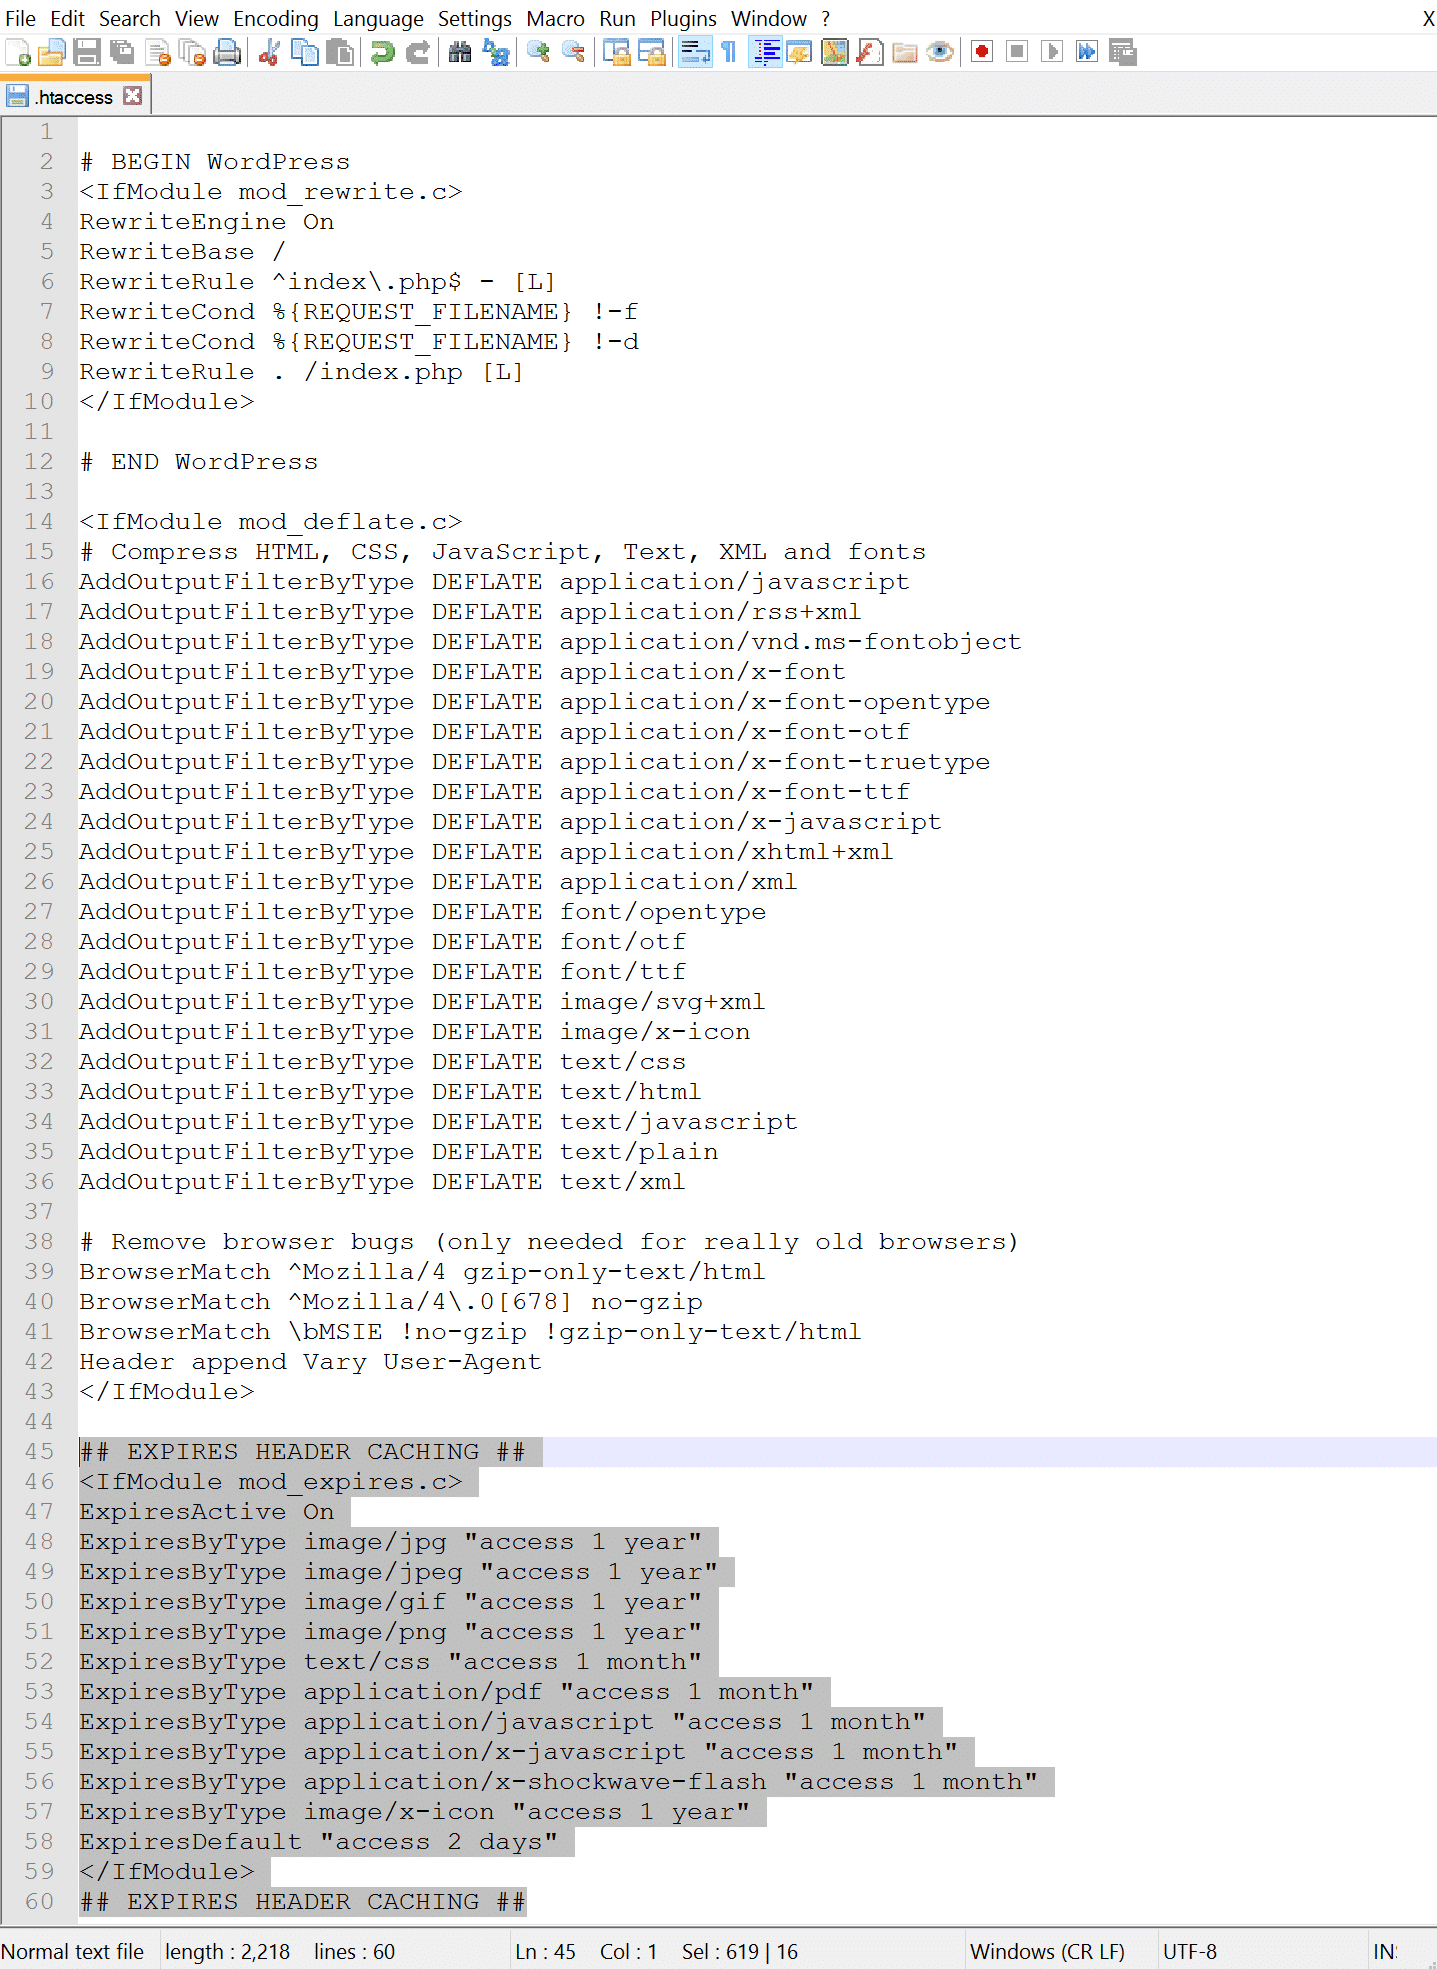
The second way to enable Gzip compression is by editing your .htaccess file. Most shared hosts use Apache, in which you can simply add the code below to your .htaccess file. You can find your .htaccess file at the root of your WordPress site via FTP.
<IfModule mod_deflate.c>
# Compress HTML, CSS, JavaScript, Text, XML and fonts
AddOutputFilterByType DEFLATE application/javascript
AddOutputFilterByType DEFLATE application/rss+xml
AddOutputFilterByType DEFLATE application/vnd.ms-fontobject
AddOutputFilterByType DEFLATE application/x-font
AddOutputFilterByType DEFLATE application/x-font-opentype
AddOutputFilterByType DEFLATE application/x-font-otf
AddOutputFilterByType DEFLATE application/x-font-truetype
AddOutputFilterByType DEFLATE application/x-font-ttf
AddOutputFilterByType DEFLATE application/x-javascript
AddOutputFilterByType DEFLATE application/xhtml+xml
AddOutputFilterByType DEFLATE application/xml
AddOutputFilterByType DEFLATE font/opentype
AddOutputFilterByType DEFLATE font/otf
AddOutputFilterByType DEFLATE font/ttf
AddOutputFilterByType DEFLATE image/svg+xml
AddOutputFilterByType DEFLATE image/x-icon
AddOutputFilterByType DEFLATE text/css
AddOutputFilterByType DEFLATE text/html
AddOutputFilterByType DEFLATE text/javascript
AddOutputFilterByType DEFLATE text/plain
AddOutputFilterByType DEFLATE text/xml

# Remove browser bugs (only needed for really old browsers)
BrowserMatch ^Mozilla/4 gzip-only-text/html
BrowserMatch ^Mozilla/4\.0[678] no-gzip
BrowserMatch \bMSIE !no-gzip !gzip-only-text/html
Header append Vary User-Agent
</IfModule>
Ensure that you add it below the current contents of your .htaccess file. Example below:
If you happen to be running on NGINX, simply add this to your nginx.conf file.
36 gzip on;
37 gzip_disable "MSIE [1-6]\.(?!.*SV1)";
38 gzip_vary on;
39 gzip_types text/plain text/css text/javascript application/javascript application/x-javascript;
A tool like Check Gzip Compression can actually show you how my bytes were saved by enabling Gzip compression. Here is an example below of what we saved on our test site.
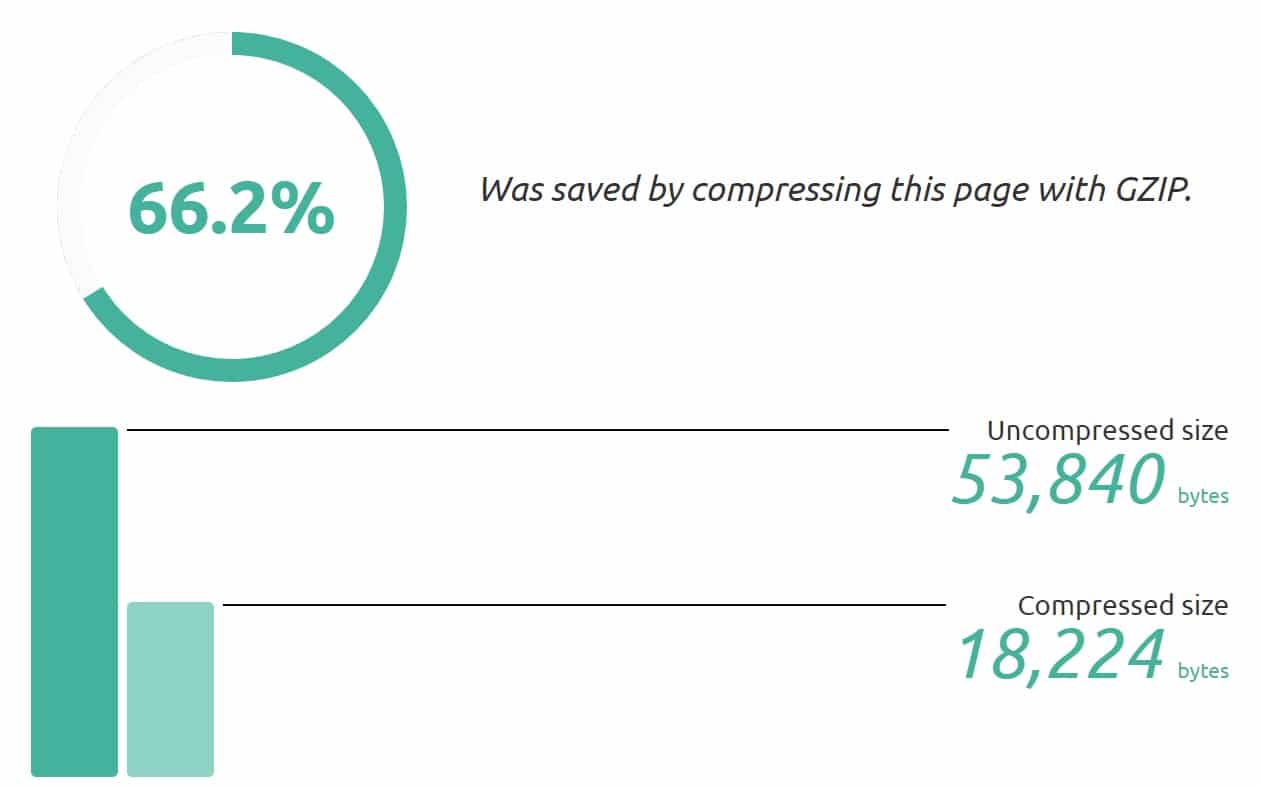
If we run our site through Google PageSpeed Insights again we can see that the Gzip compression warning is now gone and it has raised our desktop score from 69/100 to 80/100 and our mobile score from 58/100 to 67/100.
Optimize Images
The next Google PageSpeed Insights recommendation that we need to fix is the Optimize images warning. Our default “Hello world!” blog post has a featured image which is throwing up this error.
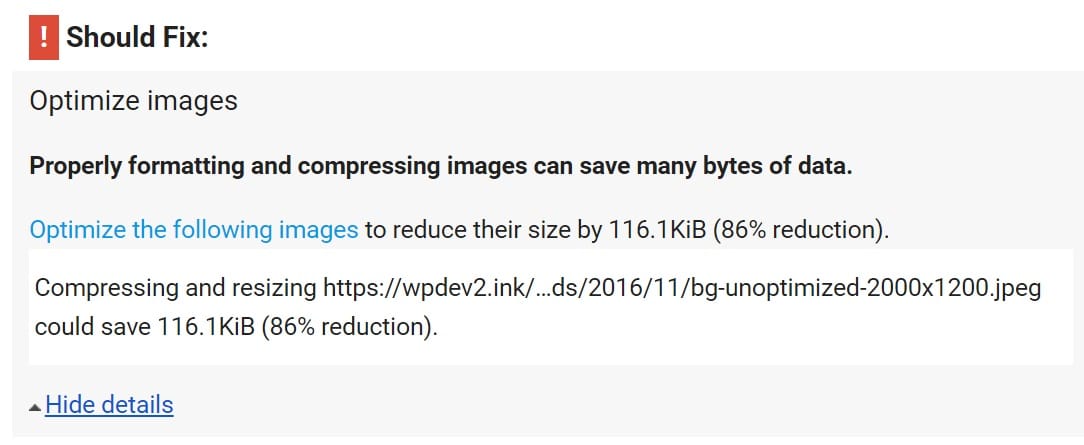
This is a very important and useful warning. According to HTTP Archive, as of November 2016, images made up for on average 65% of a webpages total weight. Optimizing your images can be one of the easiest ways to see performance improvements with your WordPress website.
There are a couple ways you can fix this. The first is to use an image optimization plugin. A plugin can actually go through and bulk optimize your entire WordPress media library and also automatically optimize them when you upload them. We actually have an entire guide on how to optimize your WordPress images. Below are a few popular image optimization plugins:
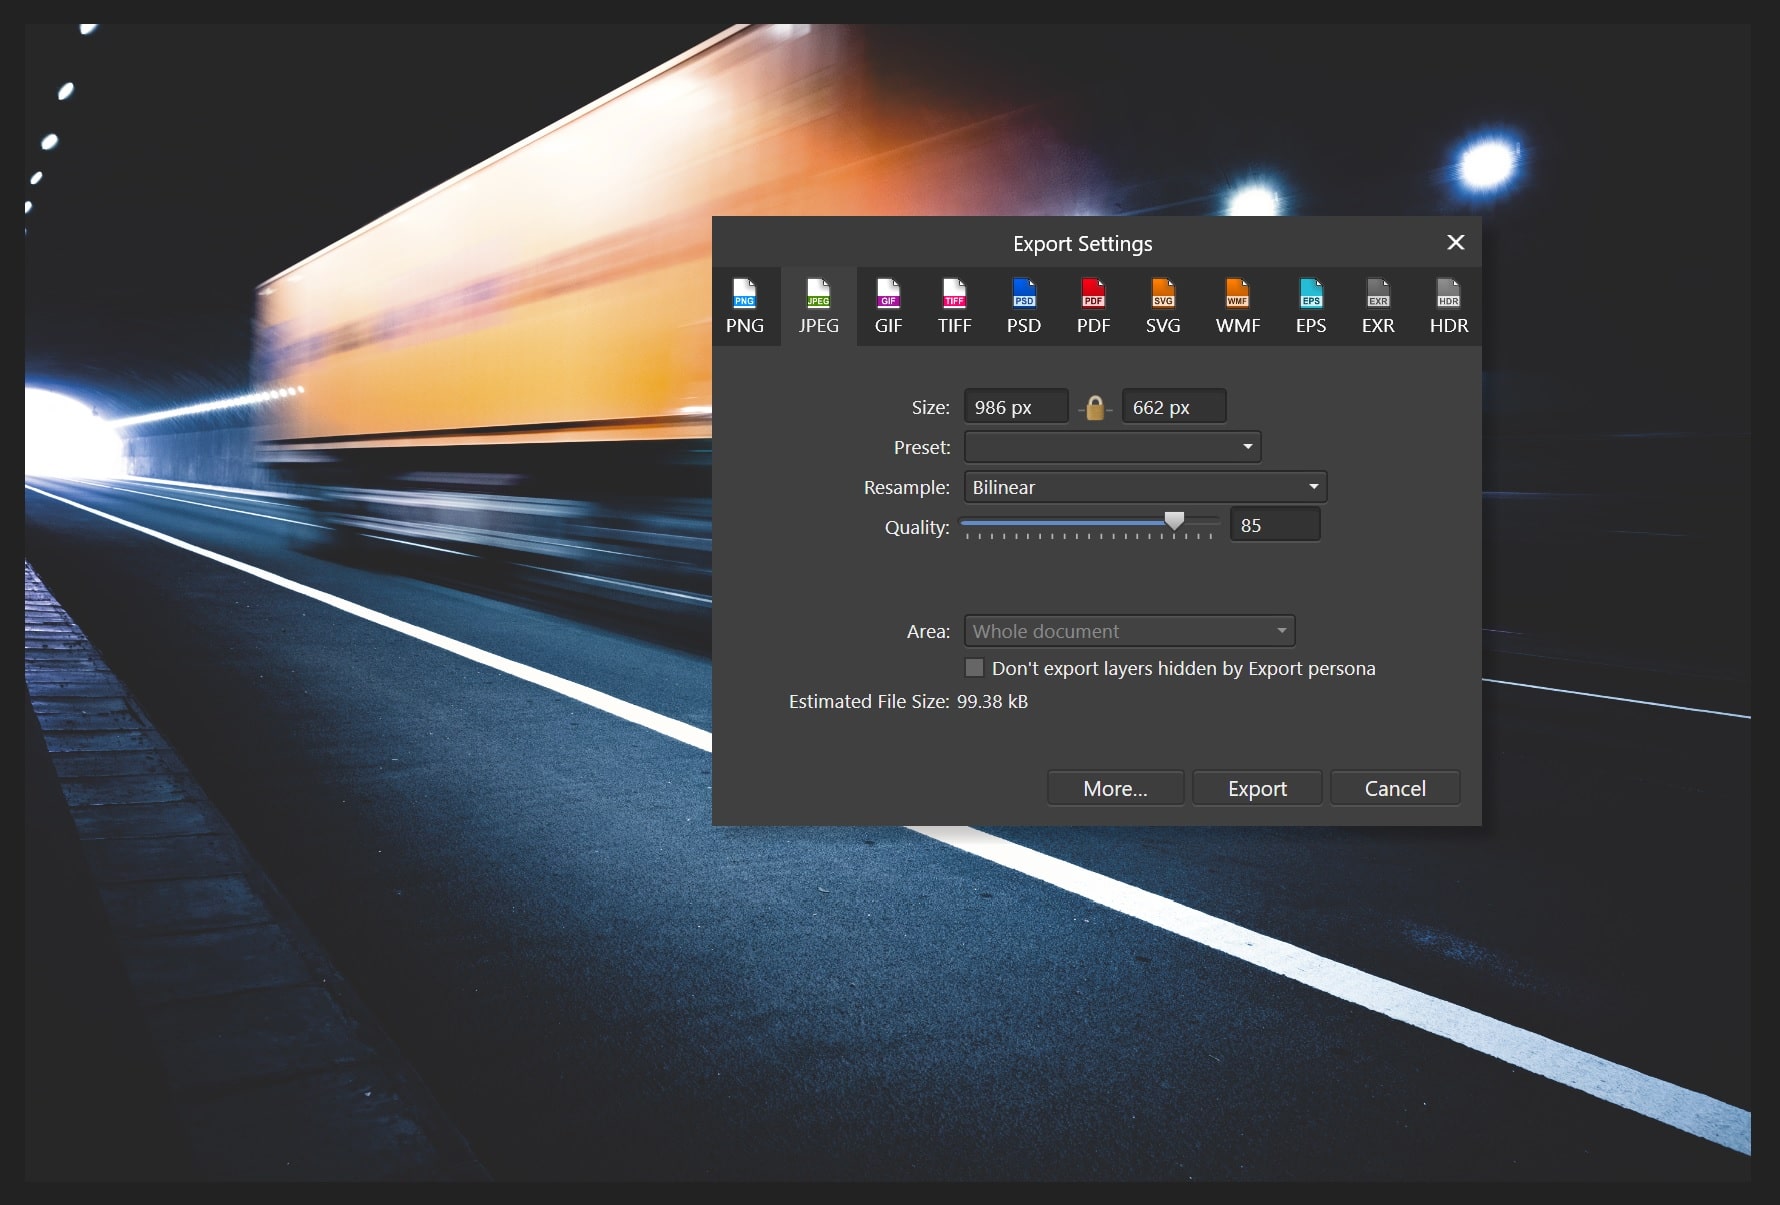
Those plugins will fix the issue, or you can also compress them before you upload them in a tool like Adobe Photoshop, Gimp, or Affinity Photo. Below is the featured image that is throwing up that warning. We can compress it before-hand by both scaling it down and lowering the quality. It is best to keep your images as small as possible. This image was originally 2.32 MB, after down-scaling and compression, it is now 99.38 kB. Remember, it is best to upload images at scale and not rely on CSS to resize them. This slows down your site.
If we run our site through Google PageSpeed Insights again we can see that the Optimize images warning is now gone and it has raised our desktop score from 80/100 to 88/100 and our mobile score from 67/100 to 73/100. We are making progress!
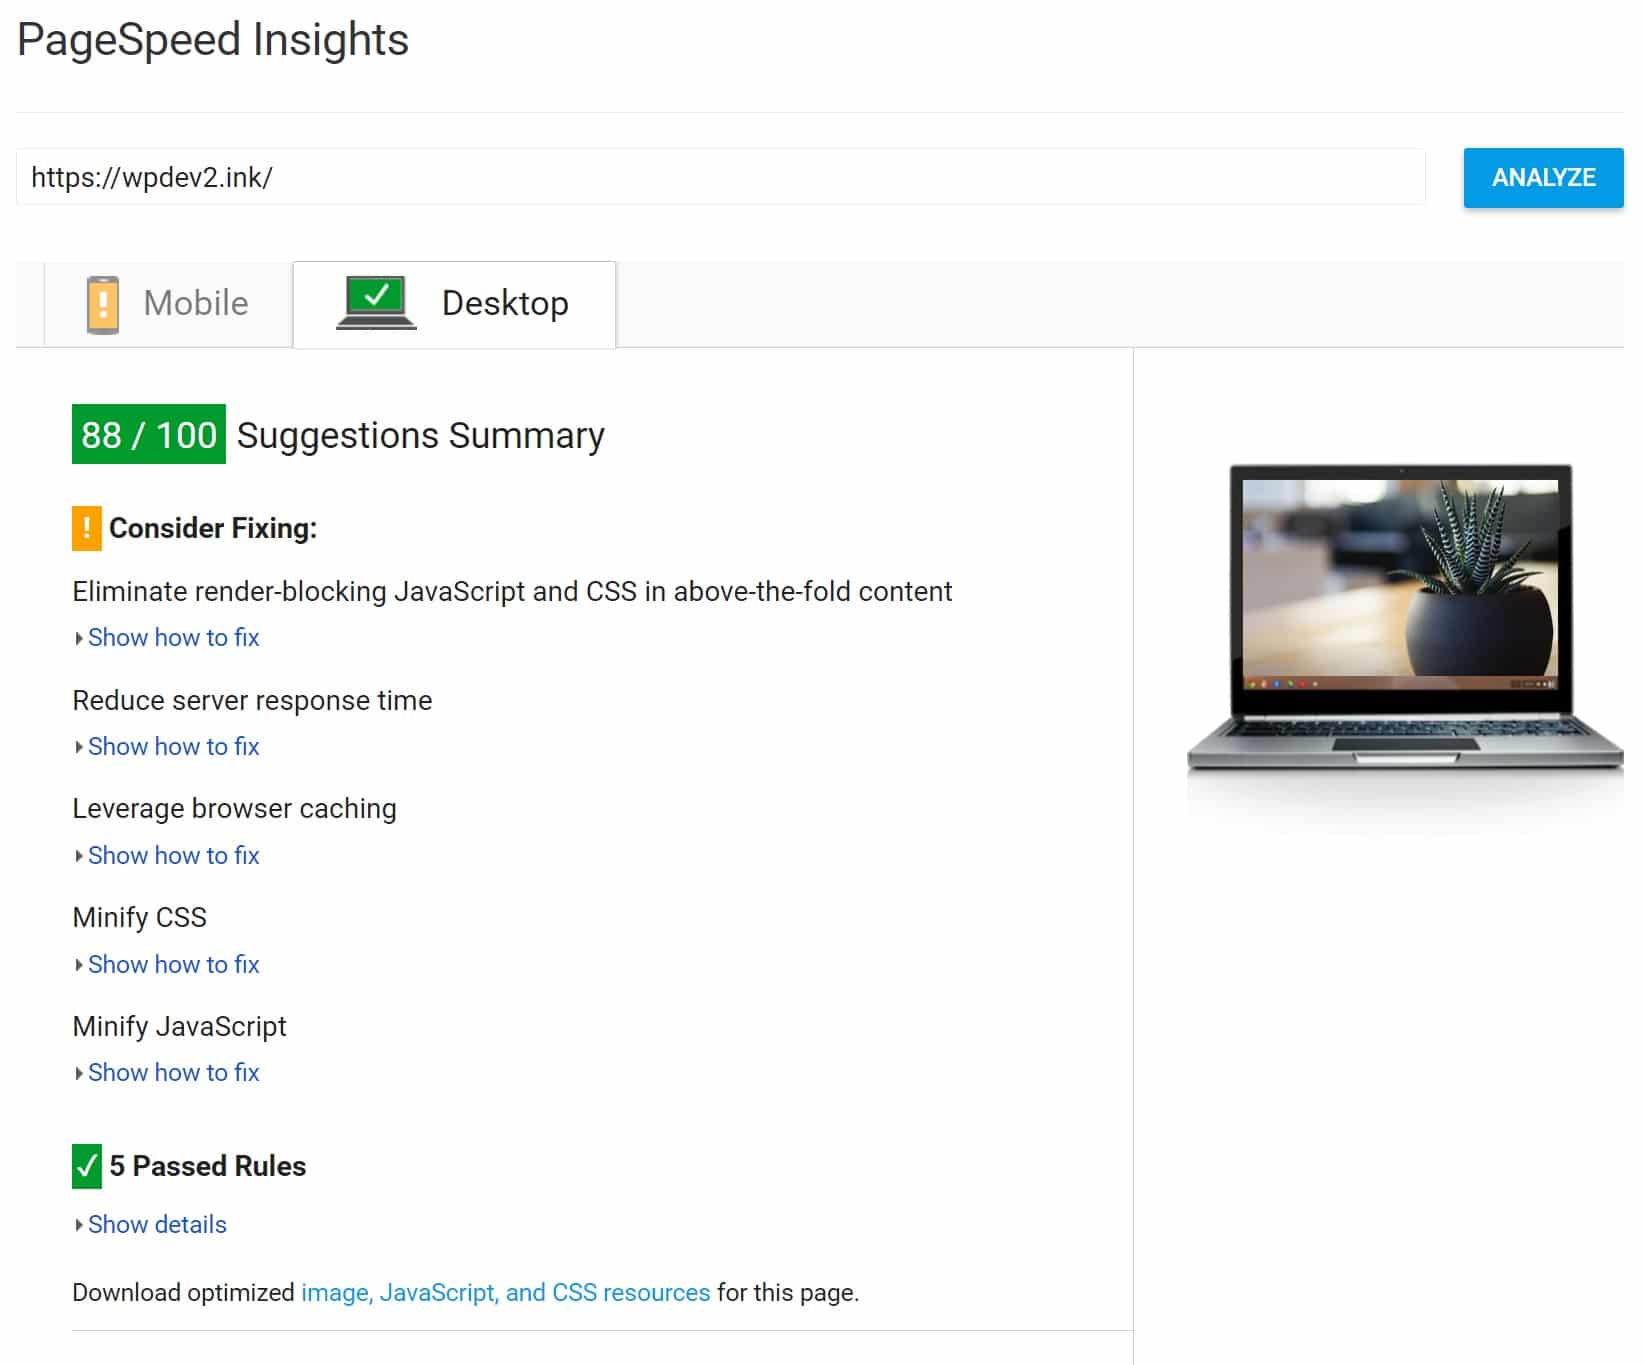
Eliminate Render-blocking JavaScript and CSS in Above-the-fold Content
The next Google PageSpeed Insights recommendation that we need to fix is the Eliminate render-blocking JavaScript and CSS in above-the-fold content warning. We actually have an entire in-depth post on the render-blocking JavaScript and CSS issue.
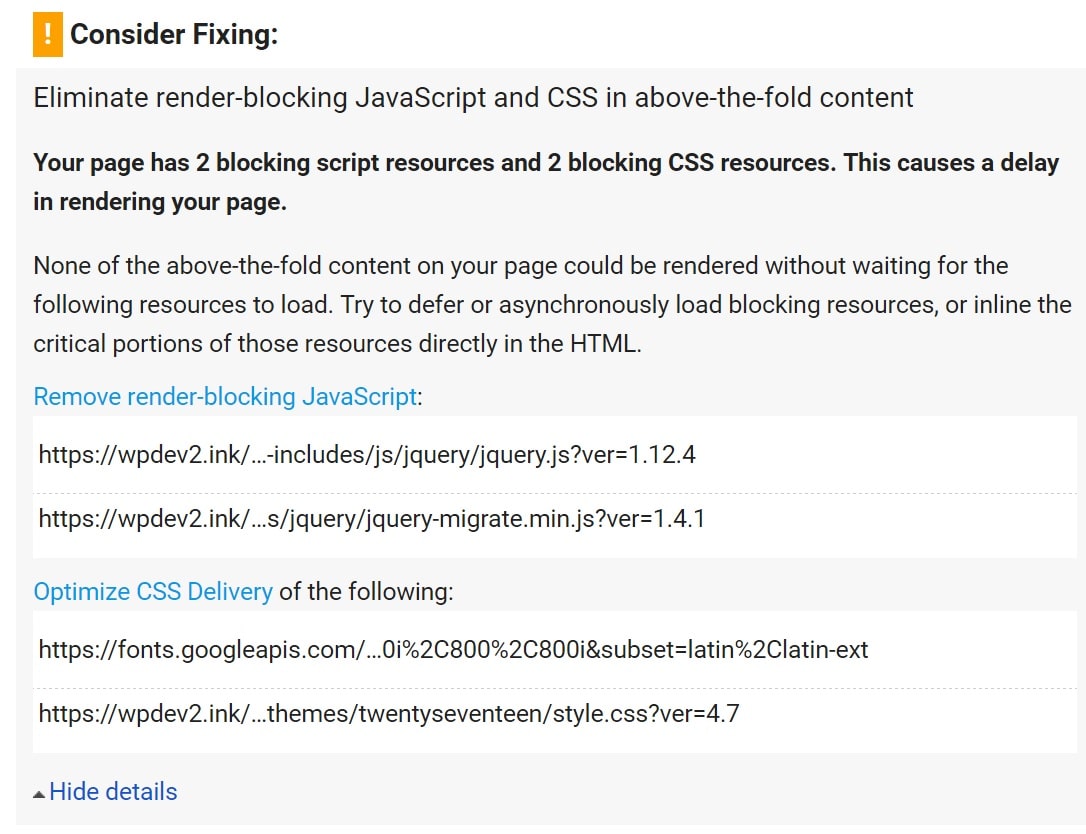
When a browser loads a webpage, JavaScript and CSS resources usually prevent the webpage from being displayed until they are downloaded and processed by the browser. Some resources need to be downloaded and processed before displaying anything. However, many CSS and JavaScript resources are conditional–that is, only applied in specific cases–or are simply not needed to render above-the-fold content. To produce the fastest possible experience for your users, you should try to eliminate any render-blocking resources that aren’t required to display above-the-fold content.
As far as Render-blocking Javascript, Google has three recommendations:
- If you don’t have a lot of JavaScript, you can inline it to get rid of this warning. You can inline JavaScript with a plugin like Autoptimize. However, this is really only valid for very small sites. Most WordPress sites have enough JavaScript where this could actually slow you down.
- The second is to load your JavaScript asynchronously. Async Javascript essentially downloads the file during HTML parsing and will pause the HTML parser to execute it when it has finished downloading.
- The third is to defer your JavaScript. The defer attribute also downloads the file during HTML parsing, but it only executes it after the parsing has completed. Also, scripts with this attribute execute in order of appearance on the page. Read more about the differences between async and defer.
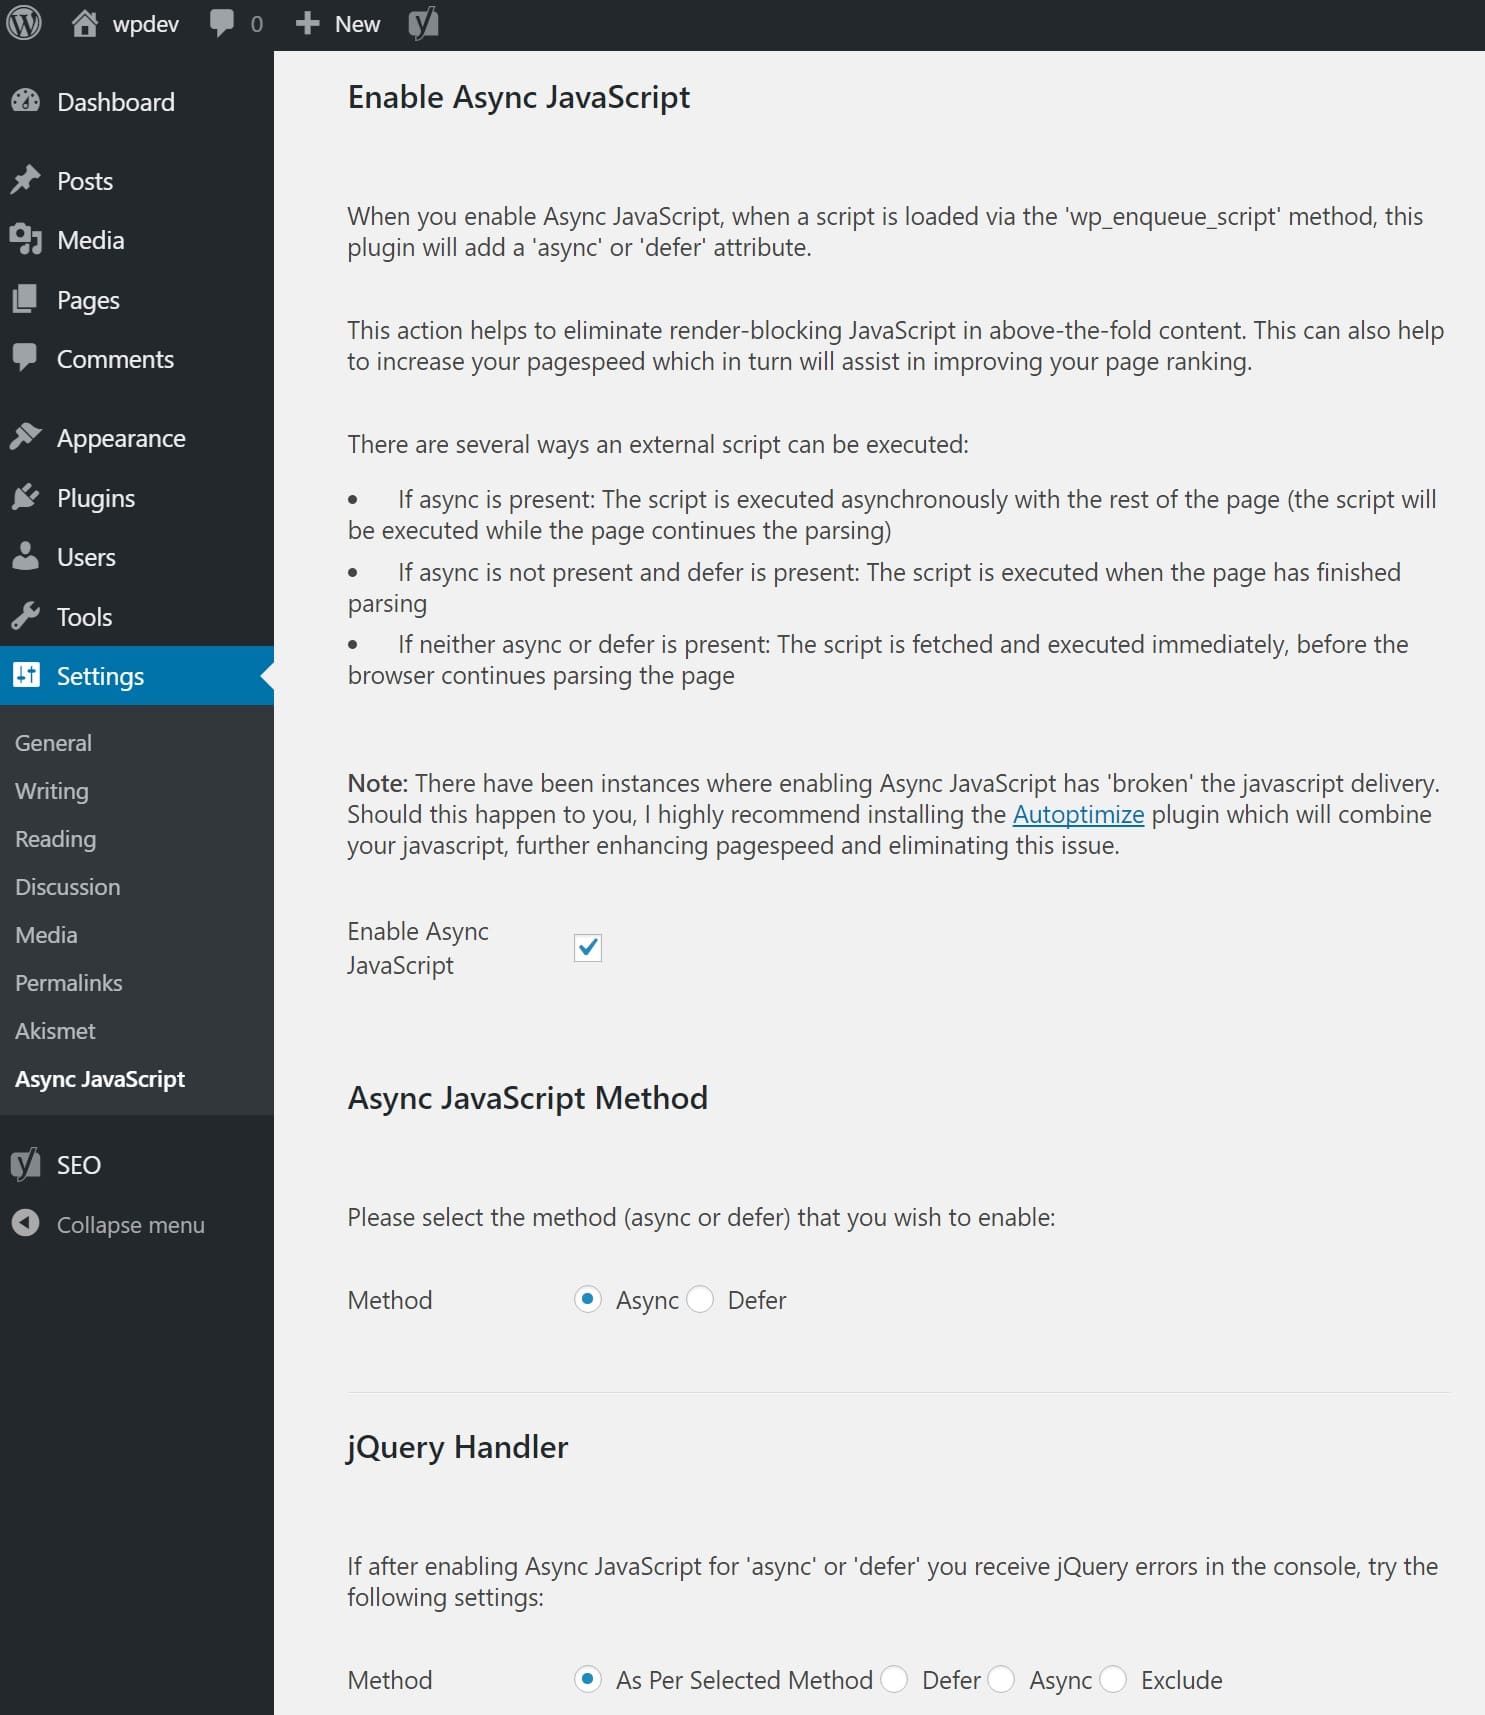
In our example we are going to make our JavaScript load asynchronously. To do this we are going to use a free plugin called Async JavaScript. You can download it from the WordPress repository or search for it within your WordPress dashboard under “Plugins > Add New.” As of writing this it currently has 9,000+ active installs with a 4.2 out of 5 star rating. Essentially the the plugin adds the ‘async’ or ‘defer’ attribute to all JavaScript loaded by the WordPress wp_enqueue_script function. The developer also has a premium version available which allows you to choose the scripts you want to async or defer.
Async Example
<script src="file1.js" async></script>Defer Example
<script src="file1.js" defer></script>After installing simply go into the settings and enable Async JavaScript.
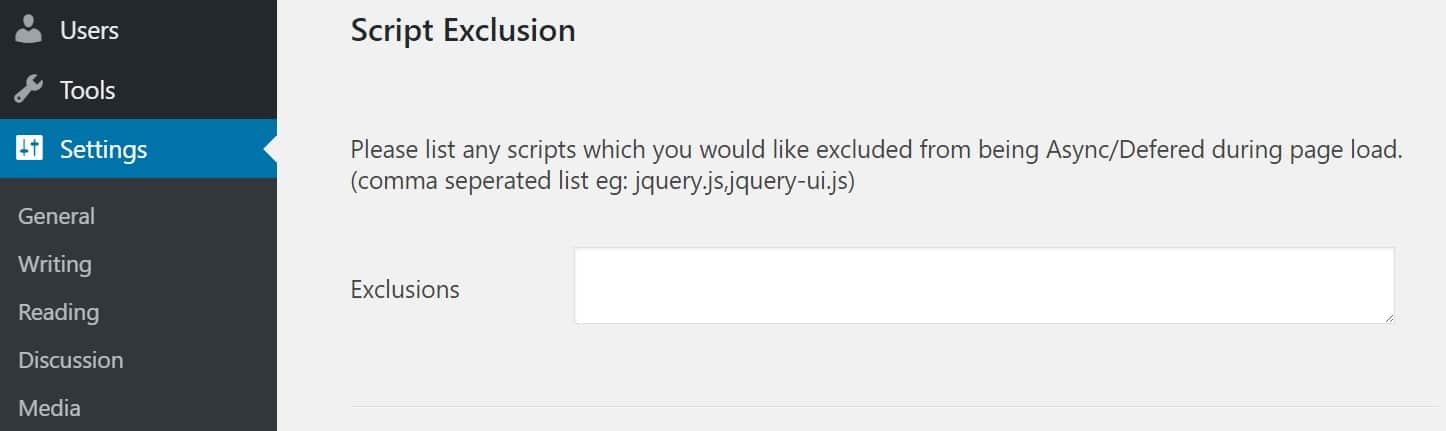
And for larger sites the script exclusion can come in handy. Or getting the premium version of the plugin. We won’t need it in this example, but if you have a site with a lot of JavaScript most likely you will end up with things breaking if you simply set everything to Async or Defer. In which case you will need to troubleshoot with which ones you can.
If you don’t want to use a plugin for this there are a few other alternatives. Such as adding the following code to your functions.php file.
/*function to add async to all scripts*/
function js_async_attr($tag){
# Add async to all remaining scripts
return str_replace( ' src', ' async="async" src', $tag );
}
add_filter( 'script_loader_tag', 'js_async_attr', 10 );
Here are two additional posts that discussing adding async or defer without a plugin:
- Async with WordPress Enqueue
- Add Defer And Async Attributes To Render Blocking Javascript In WordPress
We run our site through Google PageSpeed Insights again and as you can see the Render-blocking JavaScript is now fixed and we are left with the Optimize CSS delivery warning.
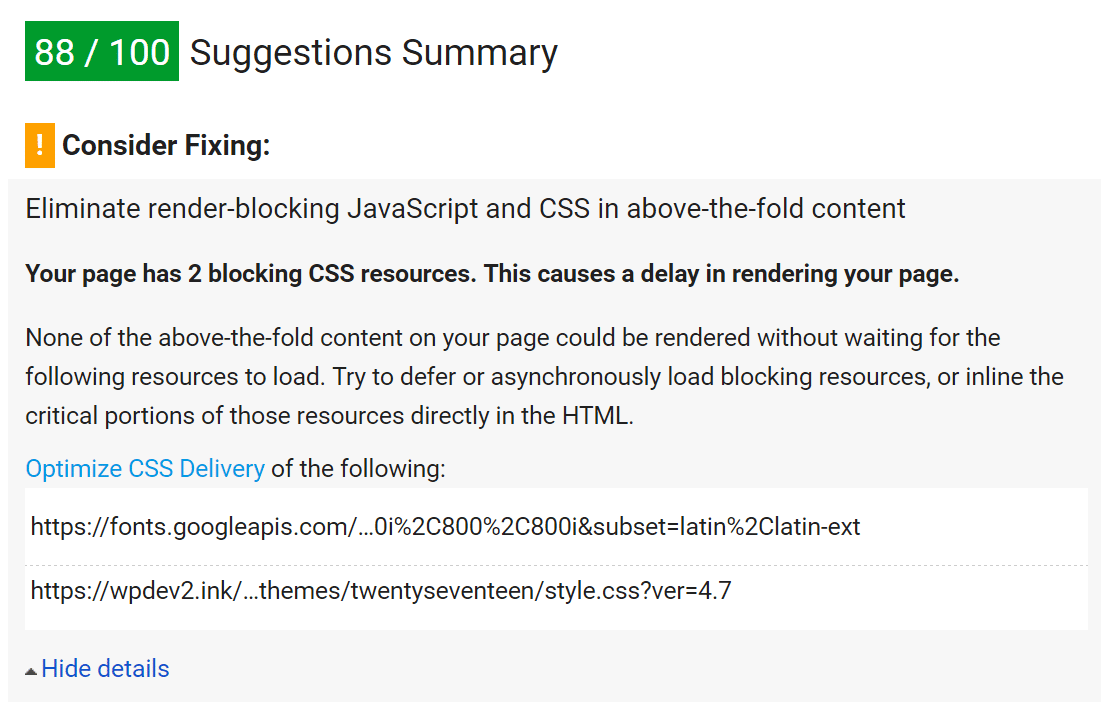
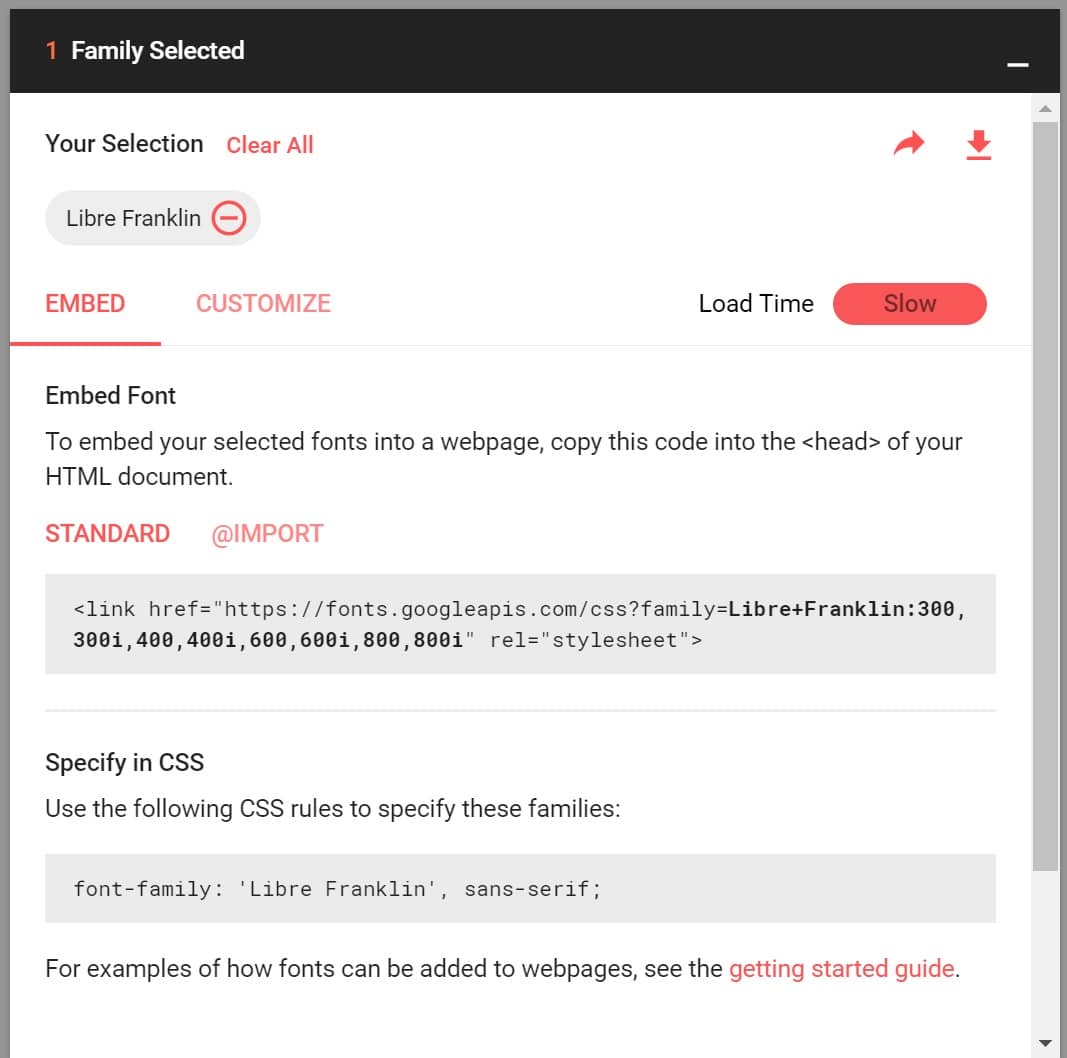
You can see that the first CSS we need to optimize is our Google fonts (fonts.googleapis.com). CSS is by default render-blocking, which includes CSS coming from web fonts. To fix this we are going to install the free Disable Google Fonts plugin. The plugin author, Milan Dinić, just recently updated this to include the new Twenty Seventeen Libre Franklin font. After installing the plugin, your Google Fonts will obviously break. So you will want to head over to Google Fonts and grab the embed code manually. We select the same font weights that are by default included in the Twenty Seventeen theme.
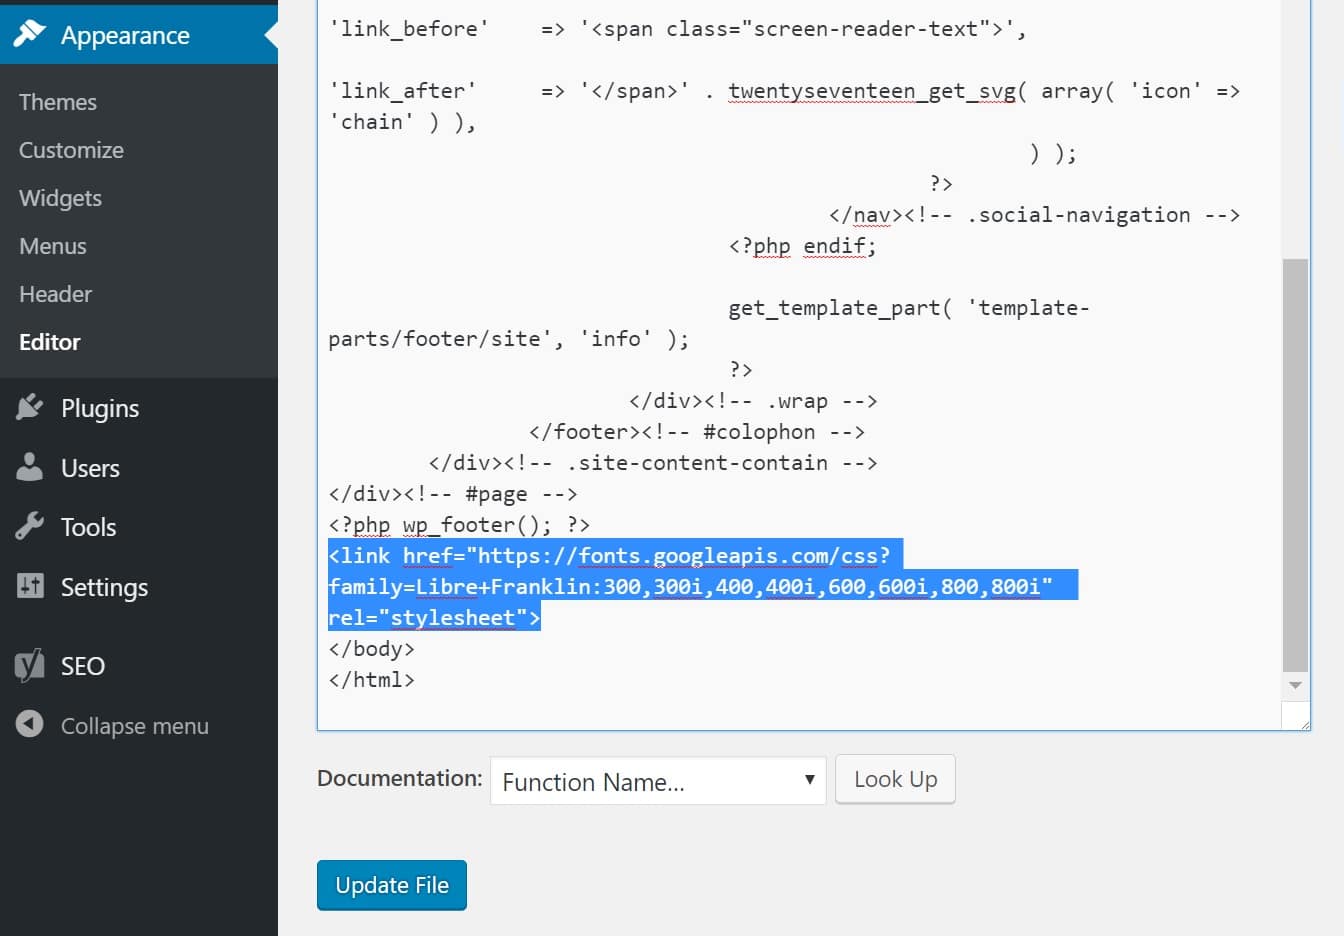
<link href="https://fonts.googleapis.com/css?family=Libre+Franklin:300,300i,400,400i,600,600i,800,800i" rel="stylesheet">
Then you will need to add that to your footer.php file, right before the </body> tag. Note: Doing it this way will result in FOUT, which is what they refer to as flash of un-styled text. But it will also get rid of the render-blocking issue. You should decide on your own site if FOUT is an acceptable user experience for your visitors. You can also use Google’s Web Font Loader.
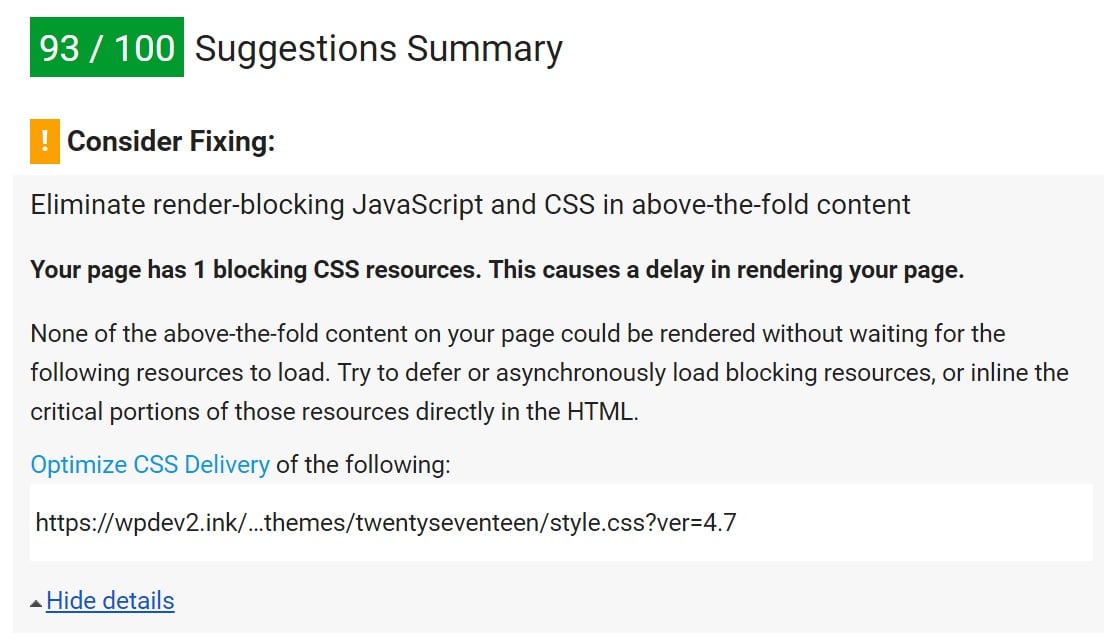
We run our test site through Google PageSpeed Insights again and now under the Optimize CSS Delivery warning we are only left with one thing, and that is the style.css file.
One of the easiest ways to fix this is to use a free WordPress plugin called Autoptimize, developed by Frank Goossens.

This plugin is pretty lightweight, only 176 KB to be exact. As of writing this, it currently has over 200,000 active installs with a 4.7 out of 5 star rating. The plugin helps you with concatenation of your scripts, minification, expires headers, and the ability to move styles to your header and scripts to your footer. This plugin is fully compatible with the Async JavaScript plugin which was used earlier.
After installing the plugin, click into the settings and select “Optimize CSS Code.” Then click the advanced tab and also enable “Aggregate inline CSS” and “Inline All CSS.” Note, depending on what theme you are doing this on, it might not be recommended to use this method. For large sites, inlining can be bad, in which case it would be actually better to simply ignore that particular Google PageSpeed Insights warning. And remember that with HTTP/2, concatenation can sometimes actually slow your site down.
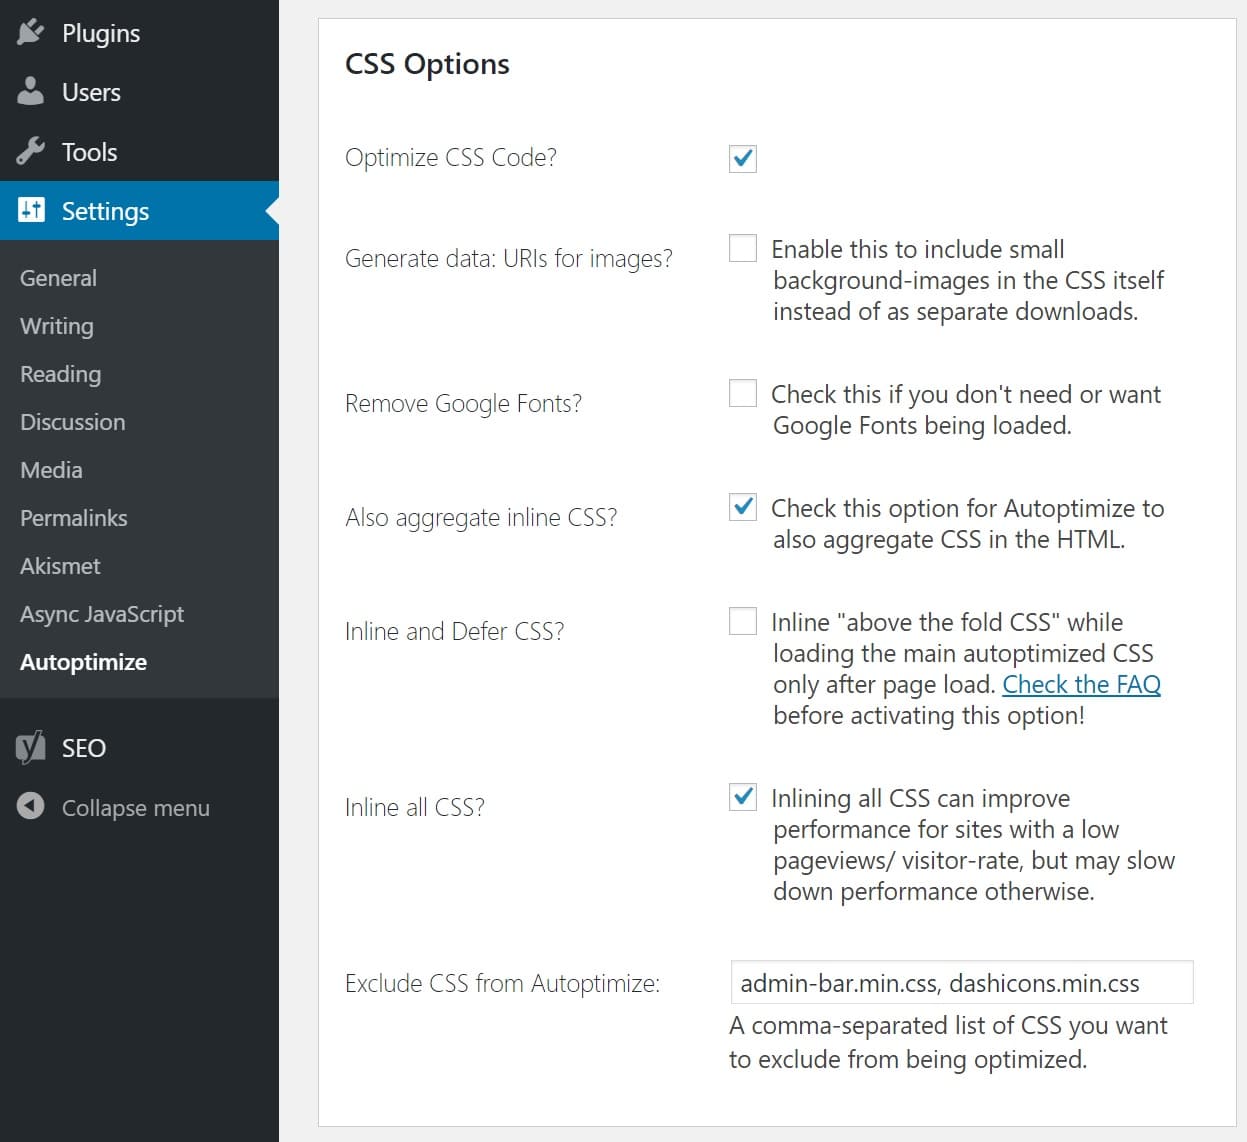
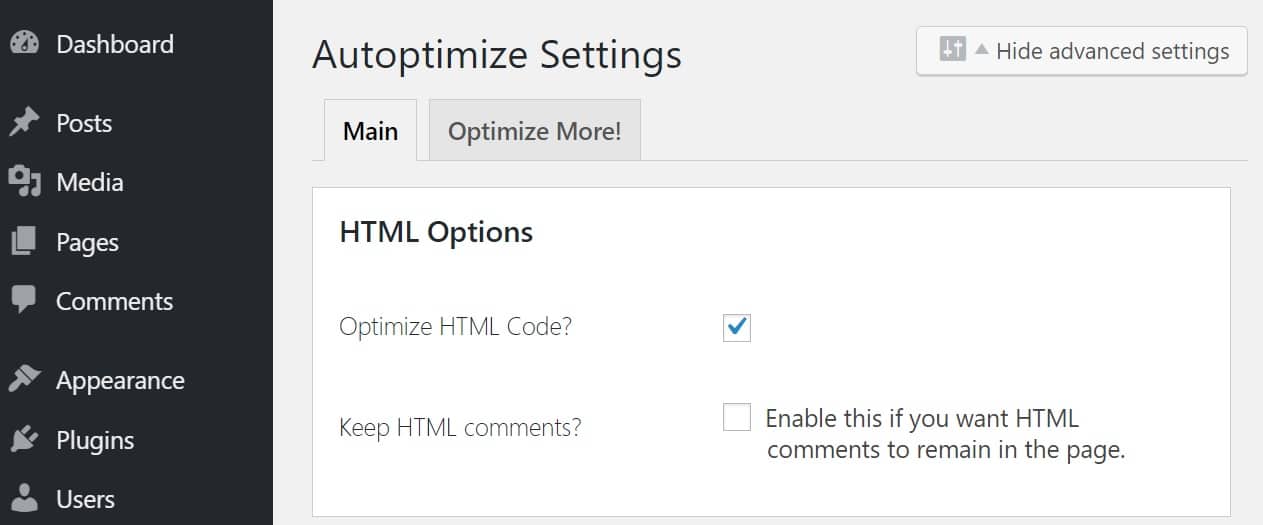
We also recommend enabling the optimize HTML code option.
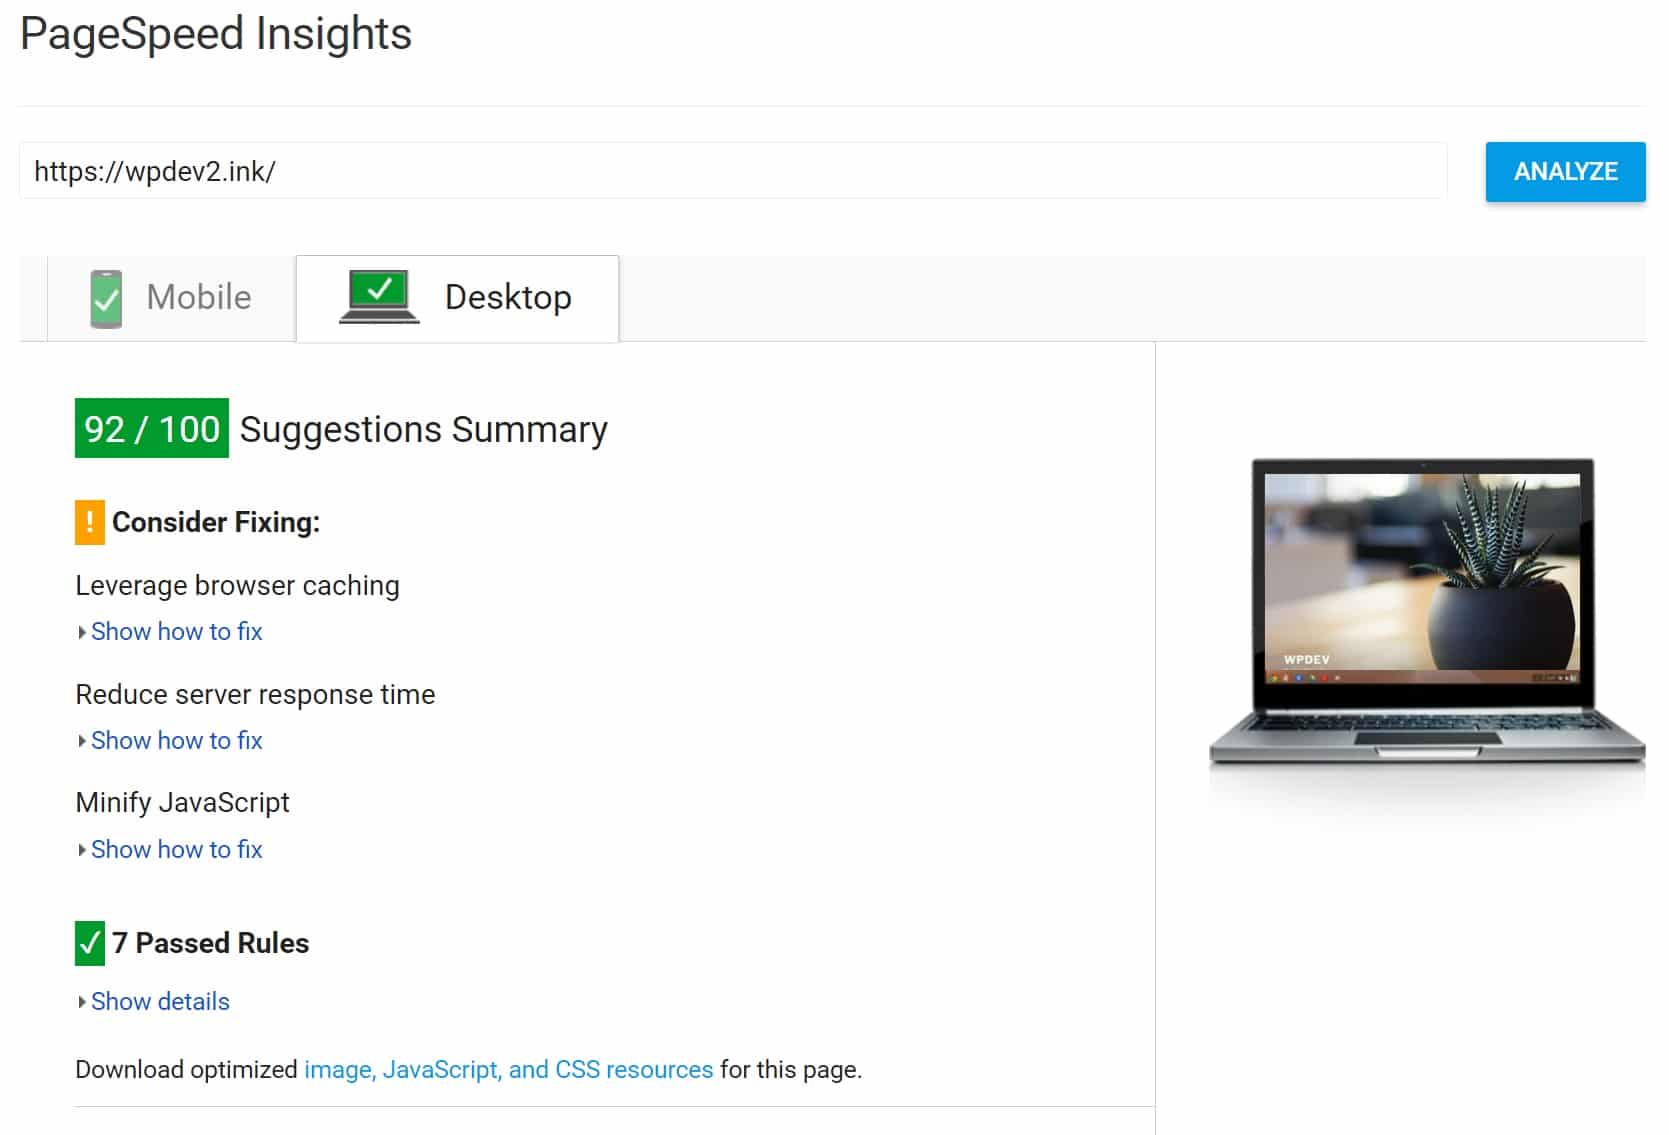
If we run our site through Google PageSpeed Insights again we can see that the Eliminate Render-blocking JavaScript and CSS in Above-the-fold Content warning is now completely gone! It also fixed the Minify CSS warning which was further below and hadn’t even got to yet. We have raised our desktop score from 88/100 to 92/100 and our mobile score from 73/100 to 89/100. We are almost there.
Leverage Browser Caching
The next Google PageSpeed Insights recommendation that we need to fix is the Leverage browser caching warning. We actually have an entire in-depth post on the leverage browser caching issue, as it pertains to WordPress.
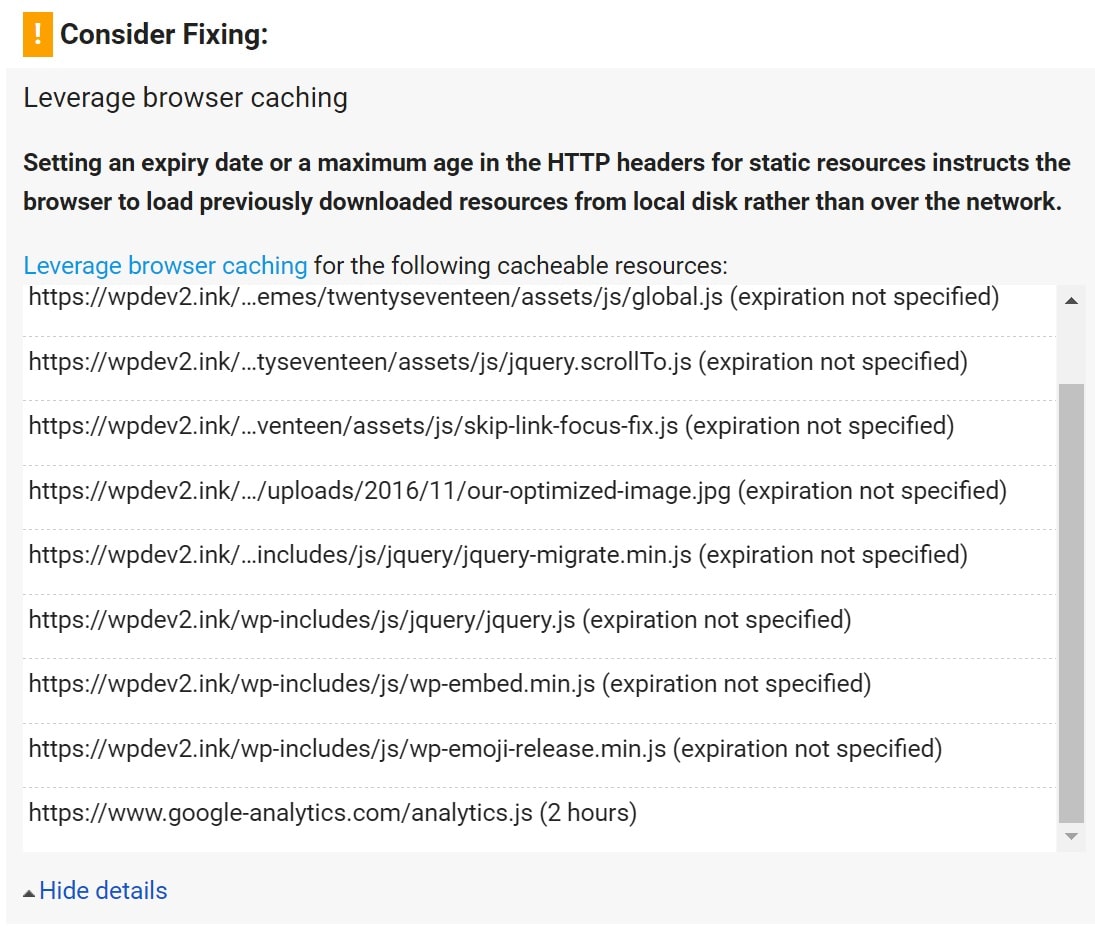
The most common reason the leverage browser caching warning is triggered is that your web server doesn’t have the appropriate headers in place. In the screenshot above you can see that all of our internal scripts have an expiration is not specified warning. When it comes to caching there are two primary methods which are used, Cache-Control headers and Expires headers. While the Cache-Control header turns on client-side caching and sets the max-age of a resource, the Expires header is used to specify a specific point in time the resource is no longer valid.
You don’t necessarily need to add both of the headers, as this is a little redundant. Cache-Control is newer and usually the recommended method, however, some web performance tools like GTMetrix still check for Expires headers. These are all examples, you can change file types, expire times, etc. based on your needs. Here are some options below. We are going to simply add expire headers in Apache on our shared host for this tutorial.
Adding Cache-Control Header in Nginx
You can add Cache-Control headers in Nginx by adding the following to your server config’s server location or block.
location ~* \.(js|css|png|jpg|jpeg|gif|ico)$ {
expires 2d;
add_header Cache-Control "public, no-transform";
}
Adding Expires Headers in Nginx
You can add Expires headers in Nginx by adding the following to your server block. In this example, you can see how to specify different expire times based on file types.
location ~* \.(jpg|jpeg|gif|png)$ {
expires 365d;
}

location ~* \.(pdf|css|html|js|swf)$ {
expires 2d;
}
Adding Cache-Control Headers in Apache
You can add Cache-Control headers in Apache by adding the following to your .htaccess file.
<filesMatch ".(ico|pdf|flv|jpg|jpeg|png|gif|js|css|swf)$">
Header set Cache-Control "max-age=604800, public"
</filesMatch>
Adding Expires Headers in Apache
You can add Expires headers in Apache by adding the following to your .htaccess file.
## EXPIRES HEADER CACHING ##
<IfModule mod_expires.c>
ExpiresActive On
ExpiresByType image/jpg "access 1 year"
ExpiresByType image/jpeg "access 1 year"
ExpiresByType image/gif "access 1 year"
ExpiresByType image/png "access 1 year"
ExpiresByType text/css "access 1 month"
ExpiresByType application/pdf "access 1 month"
ExpiresByType application/javascript "access 1 month"
ExpiresByType application/x-javascript "access 1 month"
ExpiresByType application/x-shockwave-flash "access 1 month"
ExpiresByType image/x-icon "access 1 year"
ExpiresDefault "access 2 days"
</IfModule>
## EXPIRES HEADER CACHING ##
Remember we enabled Gzip compression earlier? Below is what our .htaccess file below now looks like after also adding the expires headers. We simply place it below the compression block.
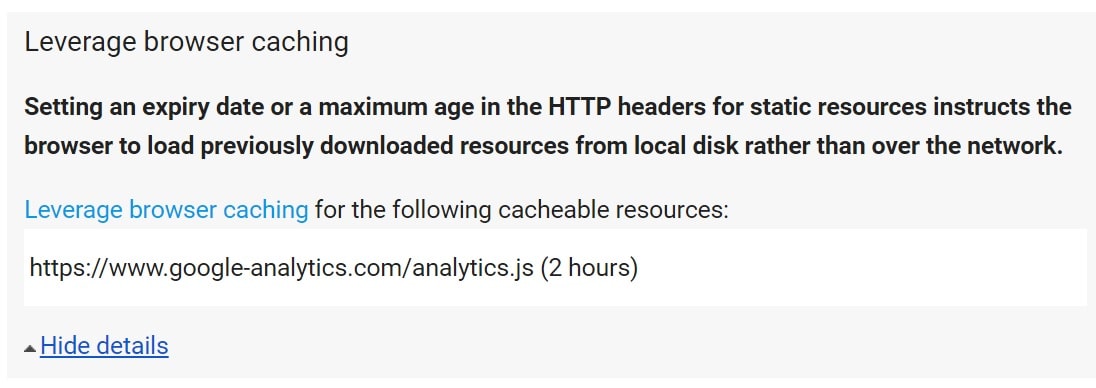
We run our test site through Google PageSpeed Insights again and now under the Leverage browser caching warning we are only left with one thing, and that is our Google Analytic’s script. This is kind of ironic seeing as this is Google’s own script. The issue is that they set a low 2 hour cache time on their asset, as seen in the screenshot below. They most likely do this because if for some reason they were to modify something on there end they want all users to get the changes as fast as possible. However there is a way to get around this, and that is by hosting Google Analytics script locally. Please be aware though that this is not supported by Google.
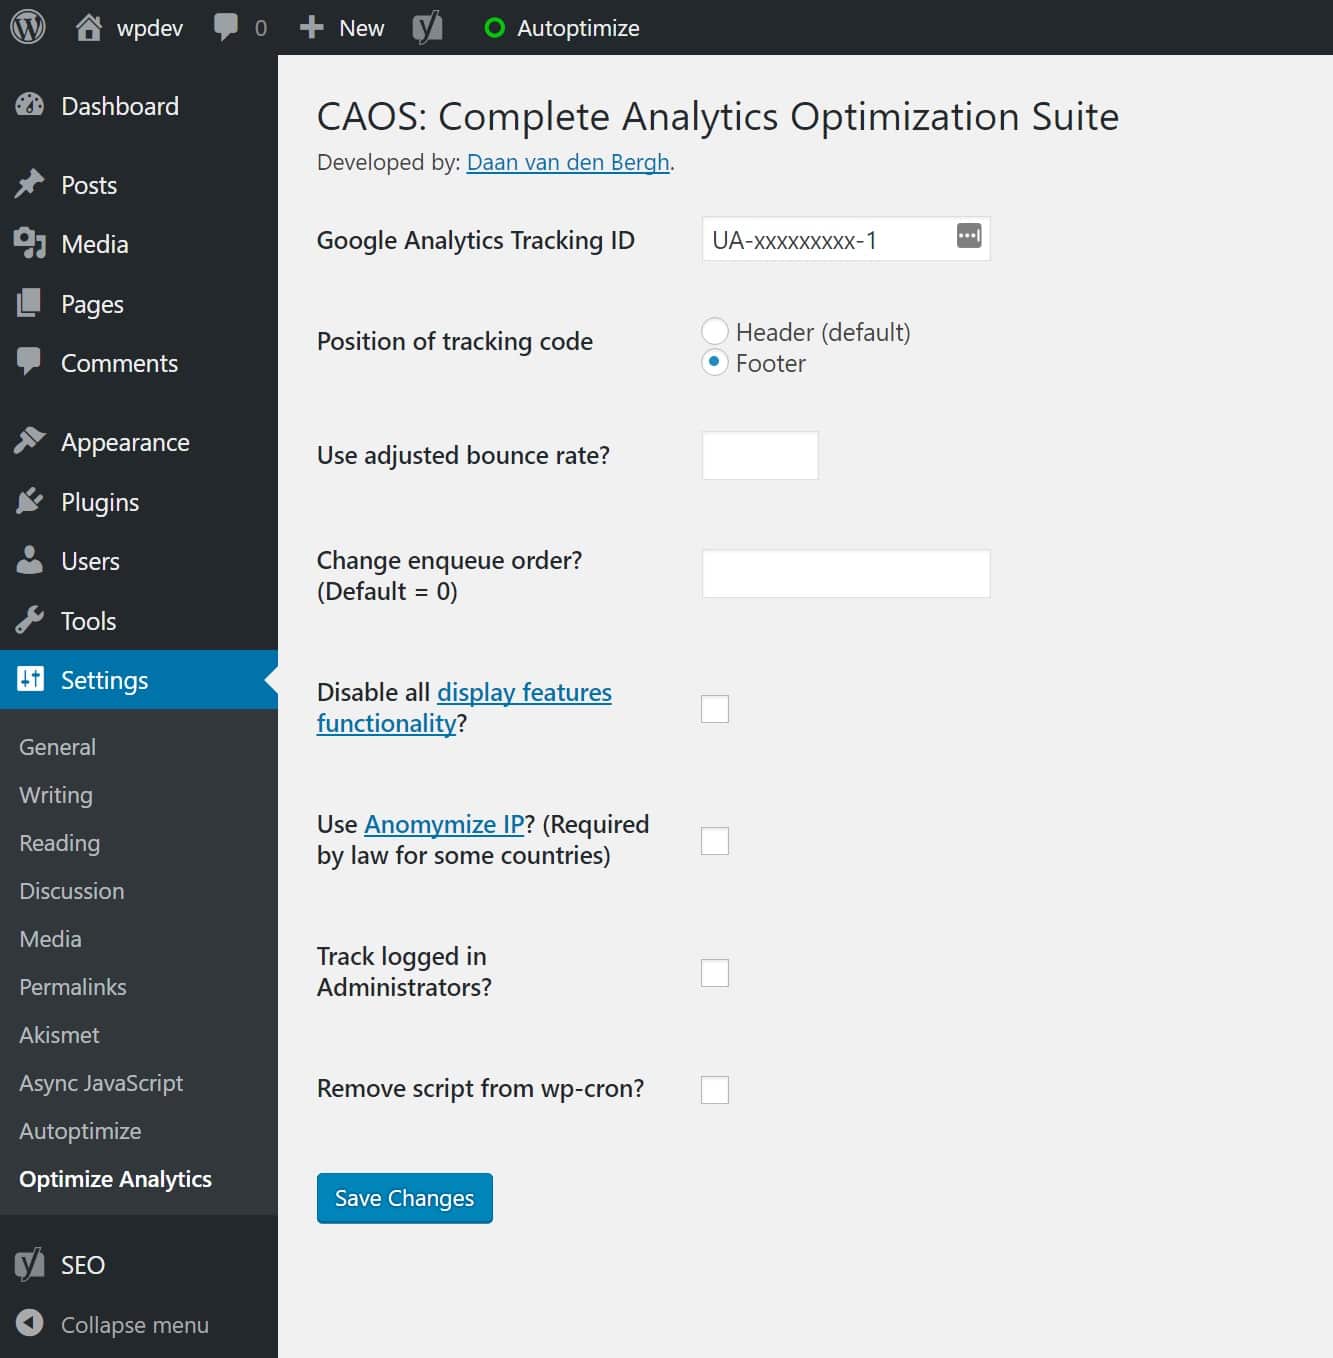
There is a great free little plugin called Complete Analytics Optimization Suite, created and developed by Daan van den Bergh, which allows you to host Google Analytics locally on your WordPress website.

You can download Complete Analytics Optimization Suite from the WordPress repository or by searching for it under “Add New” plugins in your WordPress dashboard. As of writing this the plugin currently has 1,000+ active installs with a 5 out of 5 star rating. The plugin allows you to host your Google Analytics JavaScript file (analytics.js) locally and keep it updated using wp_cron(). Other features include being able to easily anonymize the IP address of your visitors, set an adjusted bounce rate, and placement of the script (header or footer).
Just install the plugin, enter your Google Analytics Tracking ID, and the plugin adds the necessary tracking code for Google Analytics to your WordPress website, downloads and saves the analytics.js file to your server and keeps it updated using a scheduled script in wp_cron(). We recommend also setting it to load in the footer. Note: This plugin won’t work with other Google Analytics WordPress plugins.
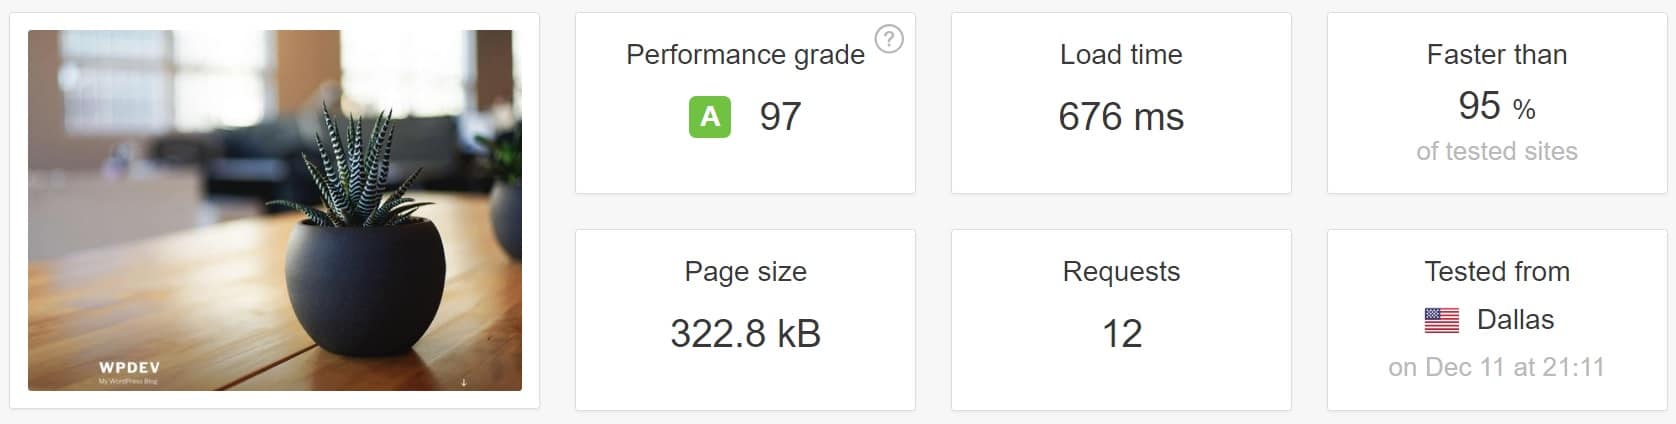
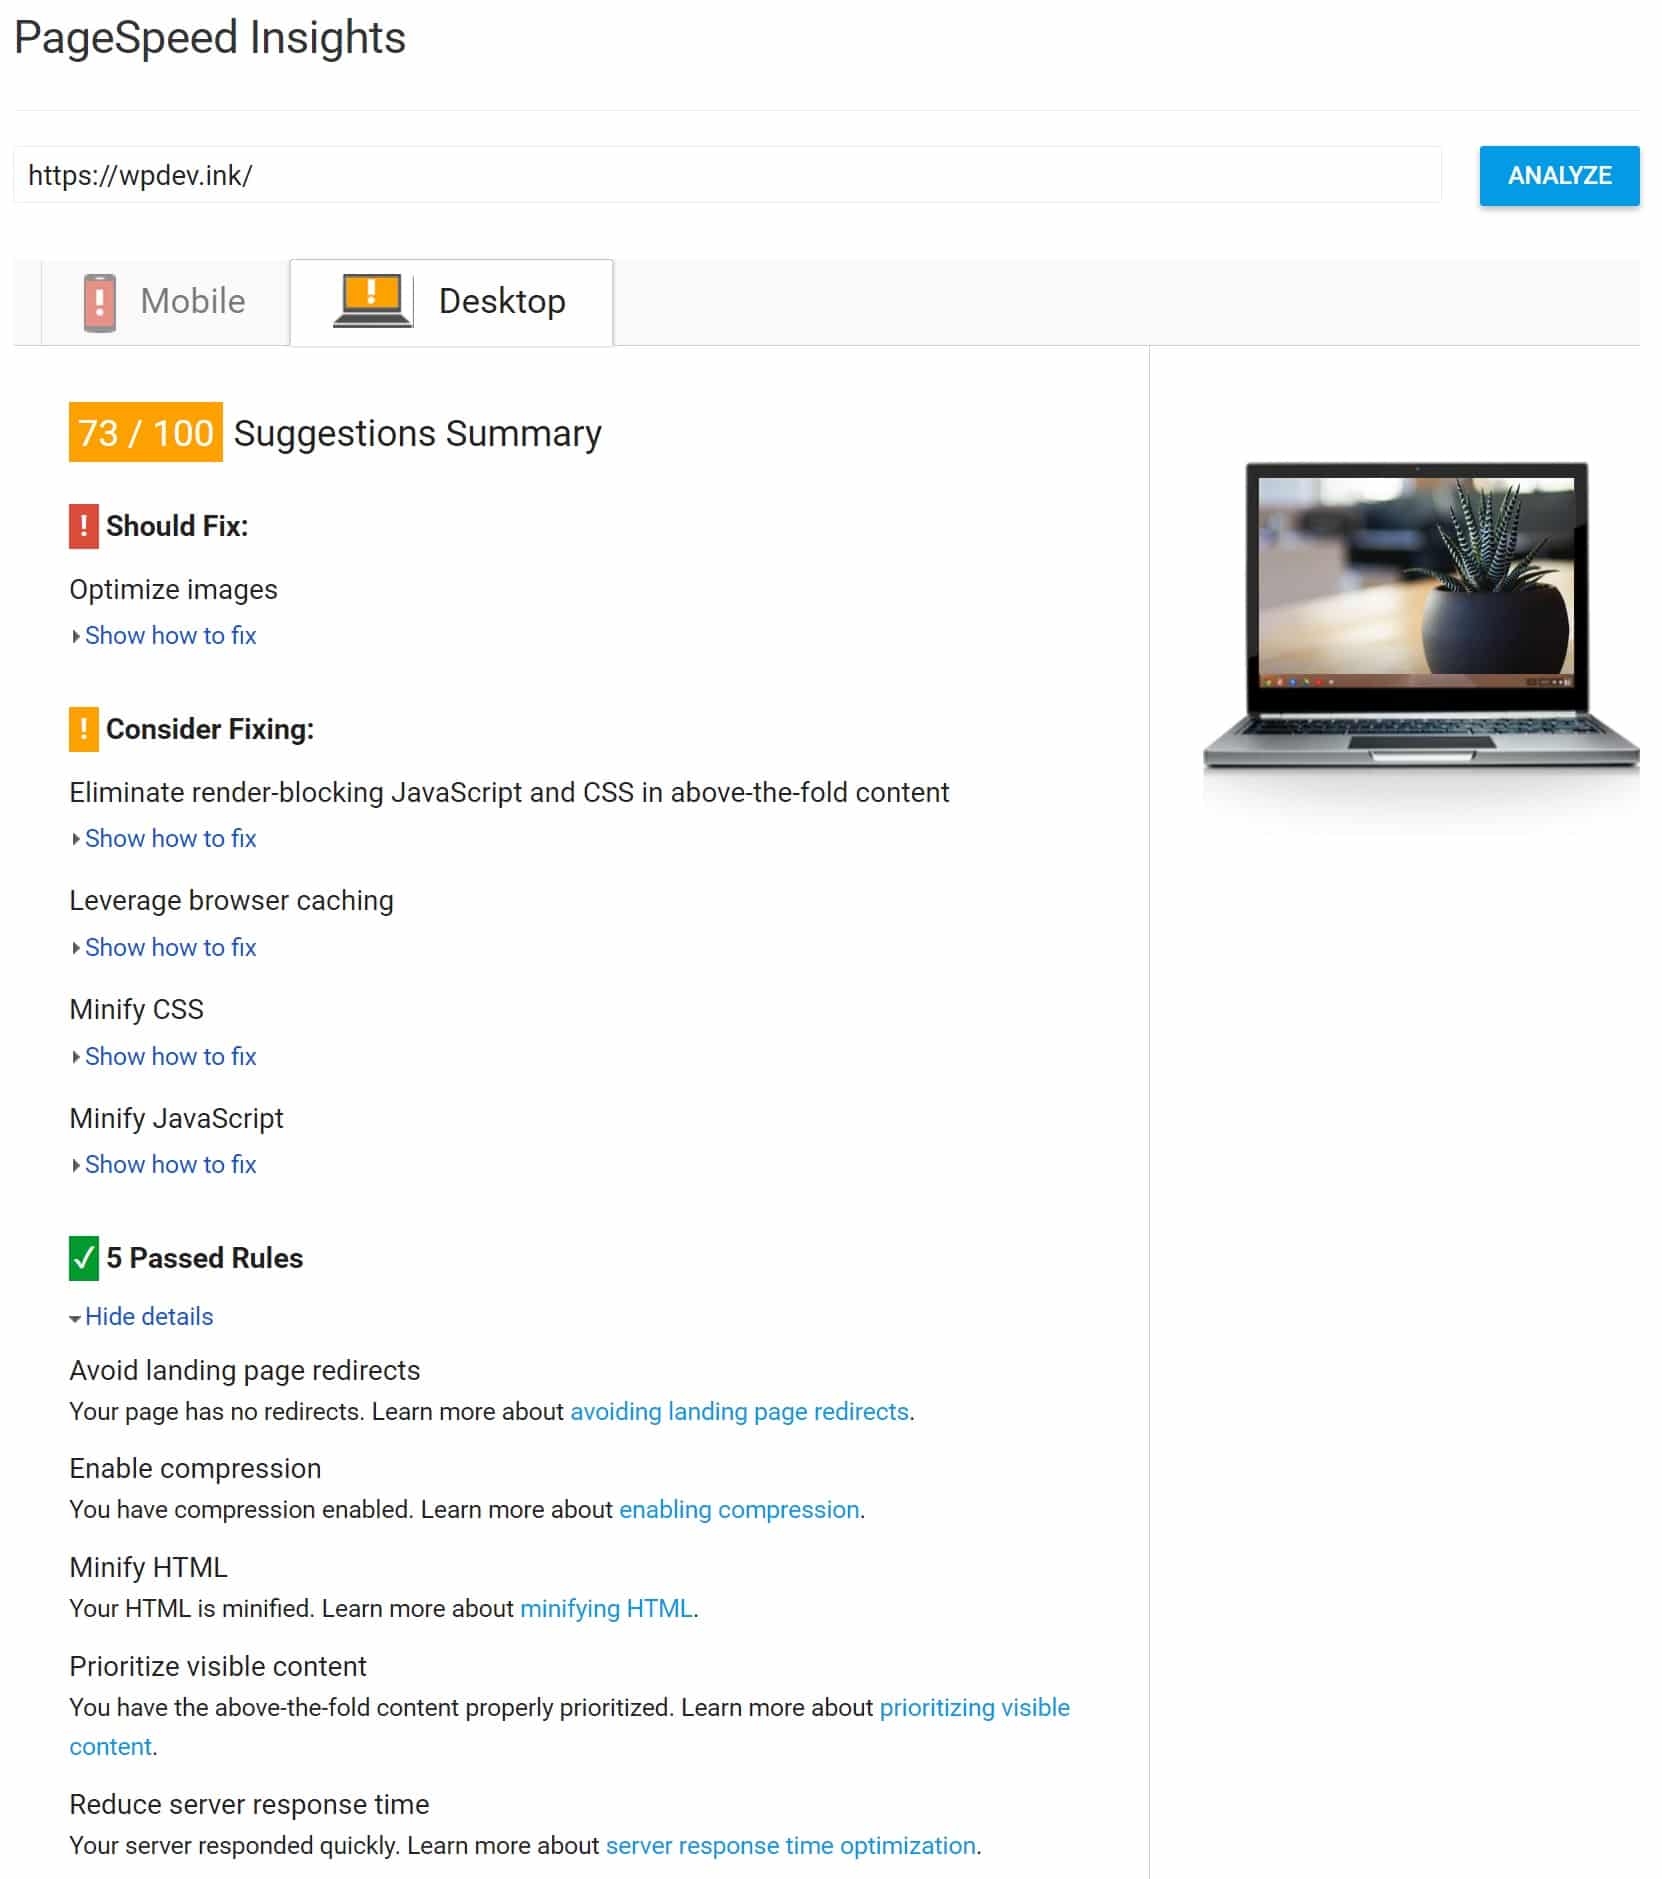
If we run our site through Google PageSpeed Insights again we can see that the Leverage browser caching warning is now completely gone! And we have raised our desktop score from 92/100 to 97/100 and our mobile score from 89/100 to 96/100. So close we can almost taste it.

Reduce server response time
The next Google PageSpeed Insights recommendation that we need to fix is the Reduce server response time warning. The one and only reason this is happening is because we are on a slow budget shared hosting plan. The server is not fast and Google knows it. So to fix this we need to implement some type of caching to speed things up. There are a lot of great caching plugins out there. In our example we are going to be using the free Cache Enabler plugin from the team over at KeyCDN.

As of writing this Cache Enabler has 10,000+ active installs with a 4.6 out of 5 star rating. It is a lightweight caching plugin for WordPress that makes your website faster by generating static HTML files plus WebP support. There are no settings to enable, simply install and your good to go. This plugin is fully compatible with the Async JavaScript and Autoptimize plugins that were used earlier. If you want even more speed though we do recommend also adding the advanced snippet to bypass PHP.
If we run our site through Google PageSpeed Insights again we can see that the Reduce server response time is now completely gone! And we have raised our desktop score from 97/100 to 99/100 and our mobile score from 96/100 to 99/100. We are about to cross the finish line.
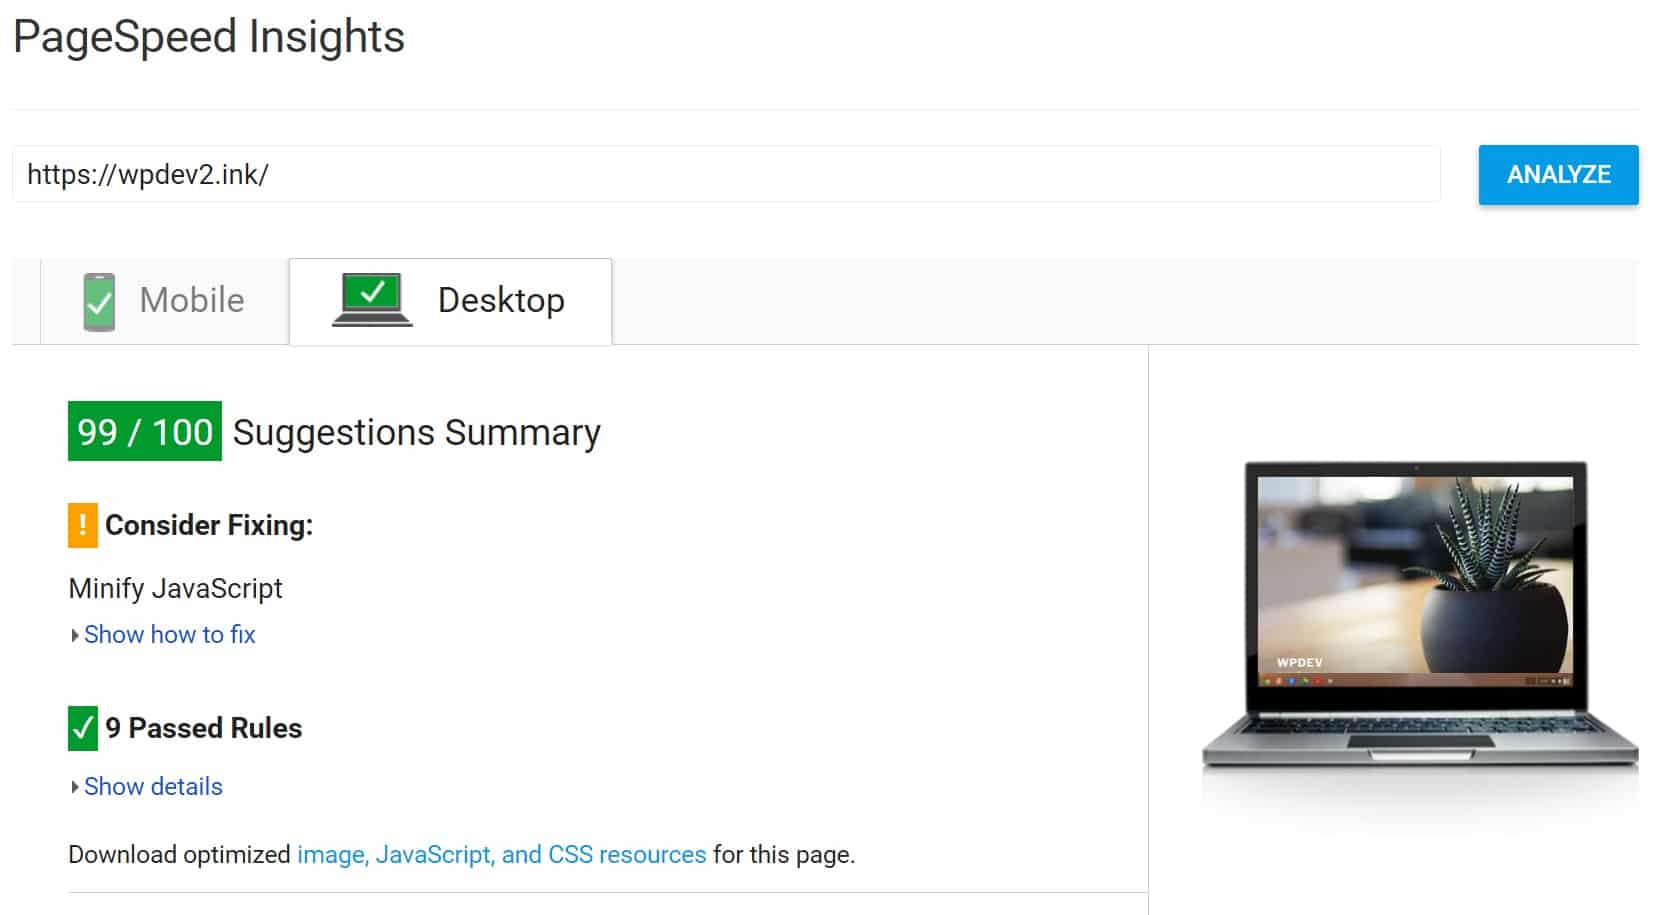
Minify JavaScript
The last Google PageSpeed Insights recommendation that we need to fix is the Minify JavaScript warning.
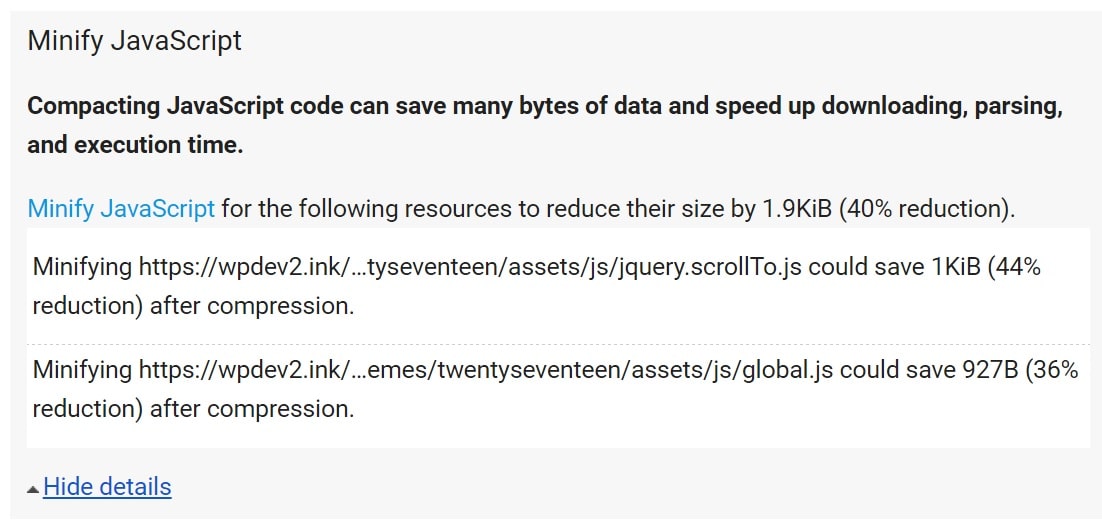
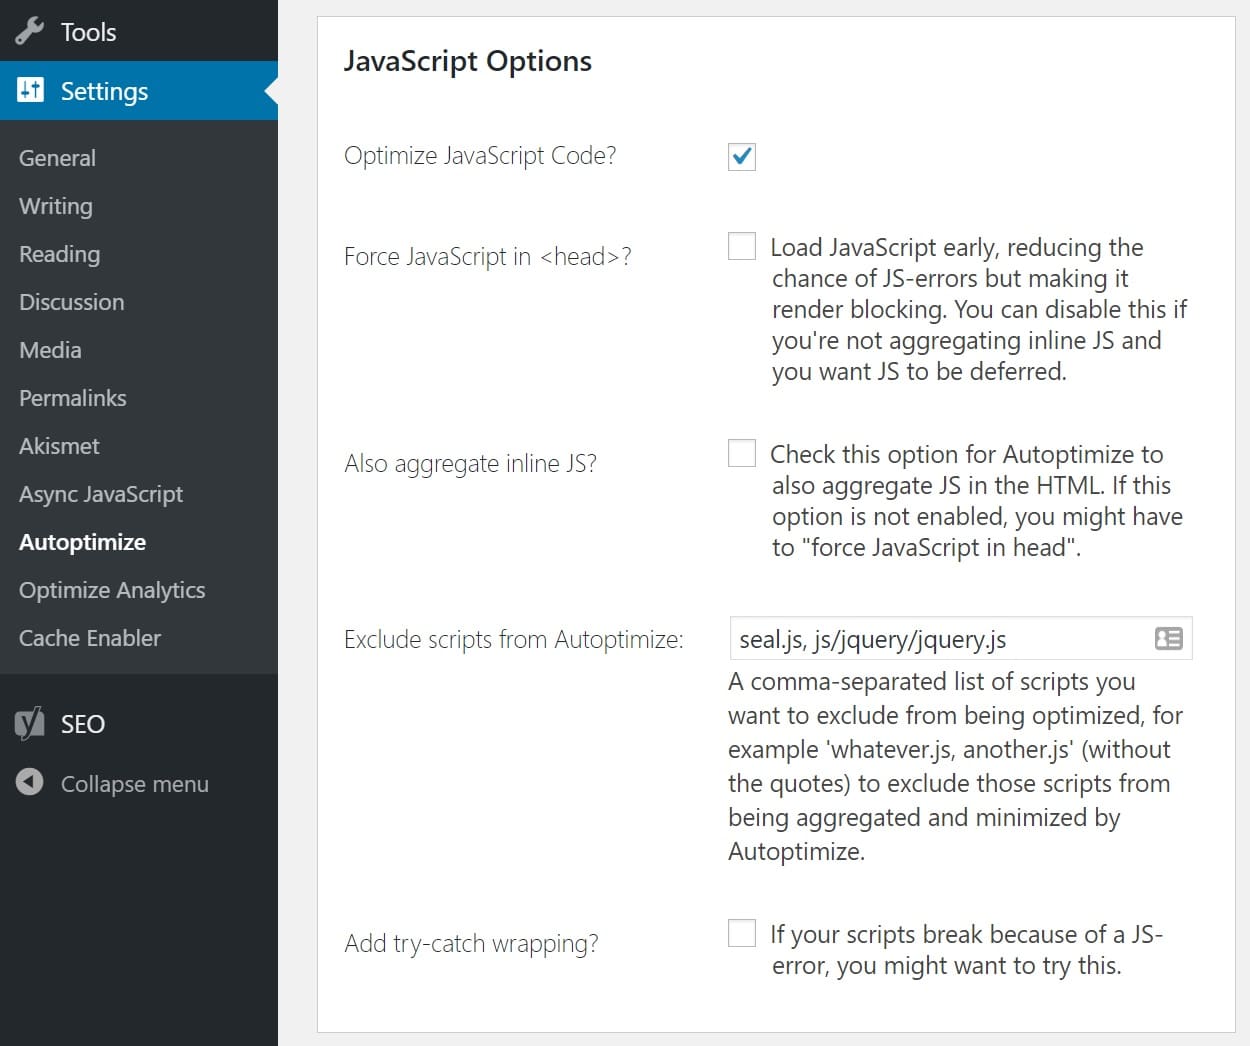
To fix this we are actually going to go back into the Autoptimize plugin settings and simply enable the Optimize JavaScript Code option. Since you now have a caching plugin running, you might also need to clear your cache after doing this to see results.
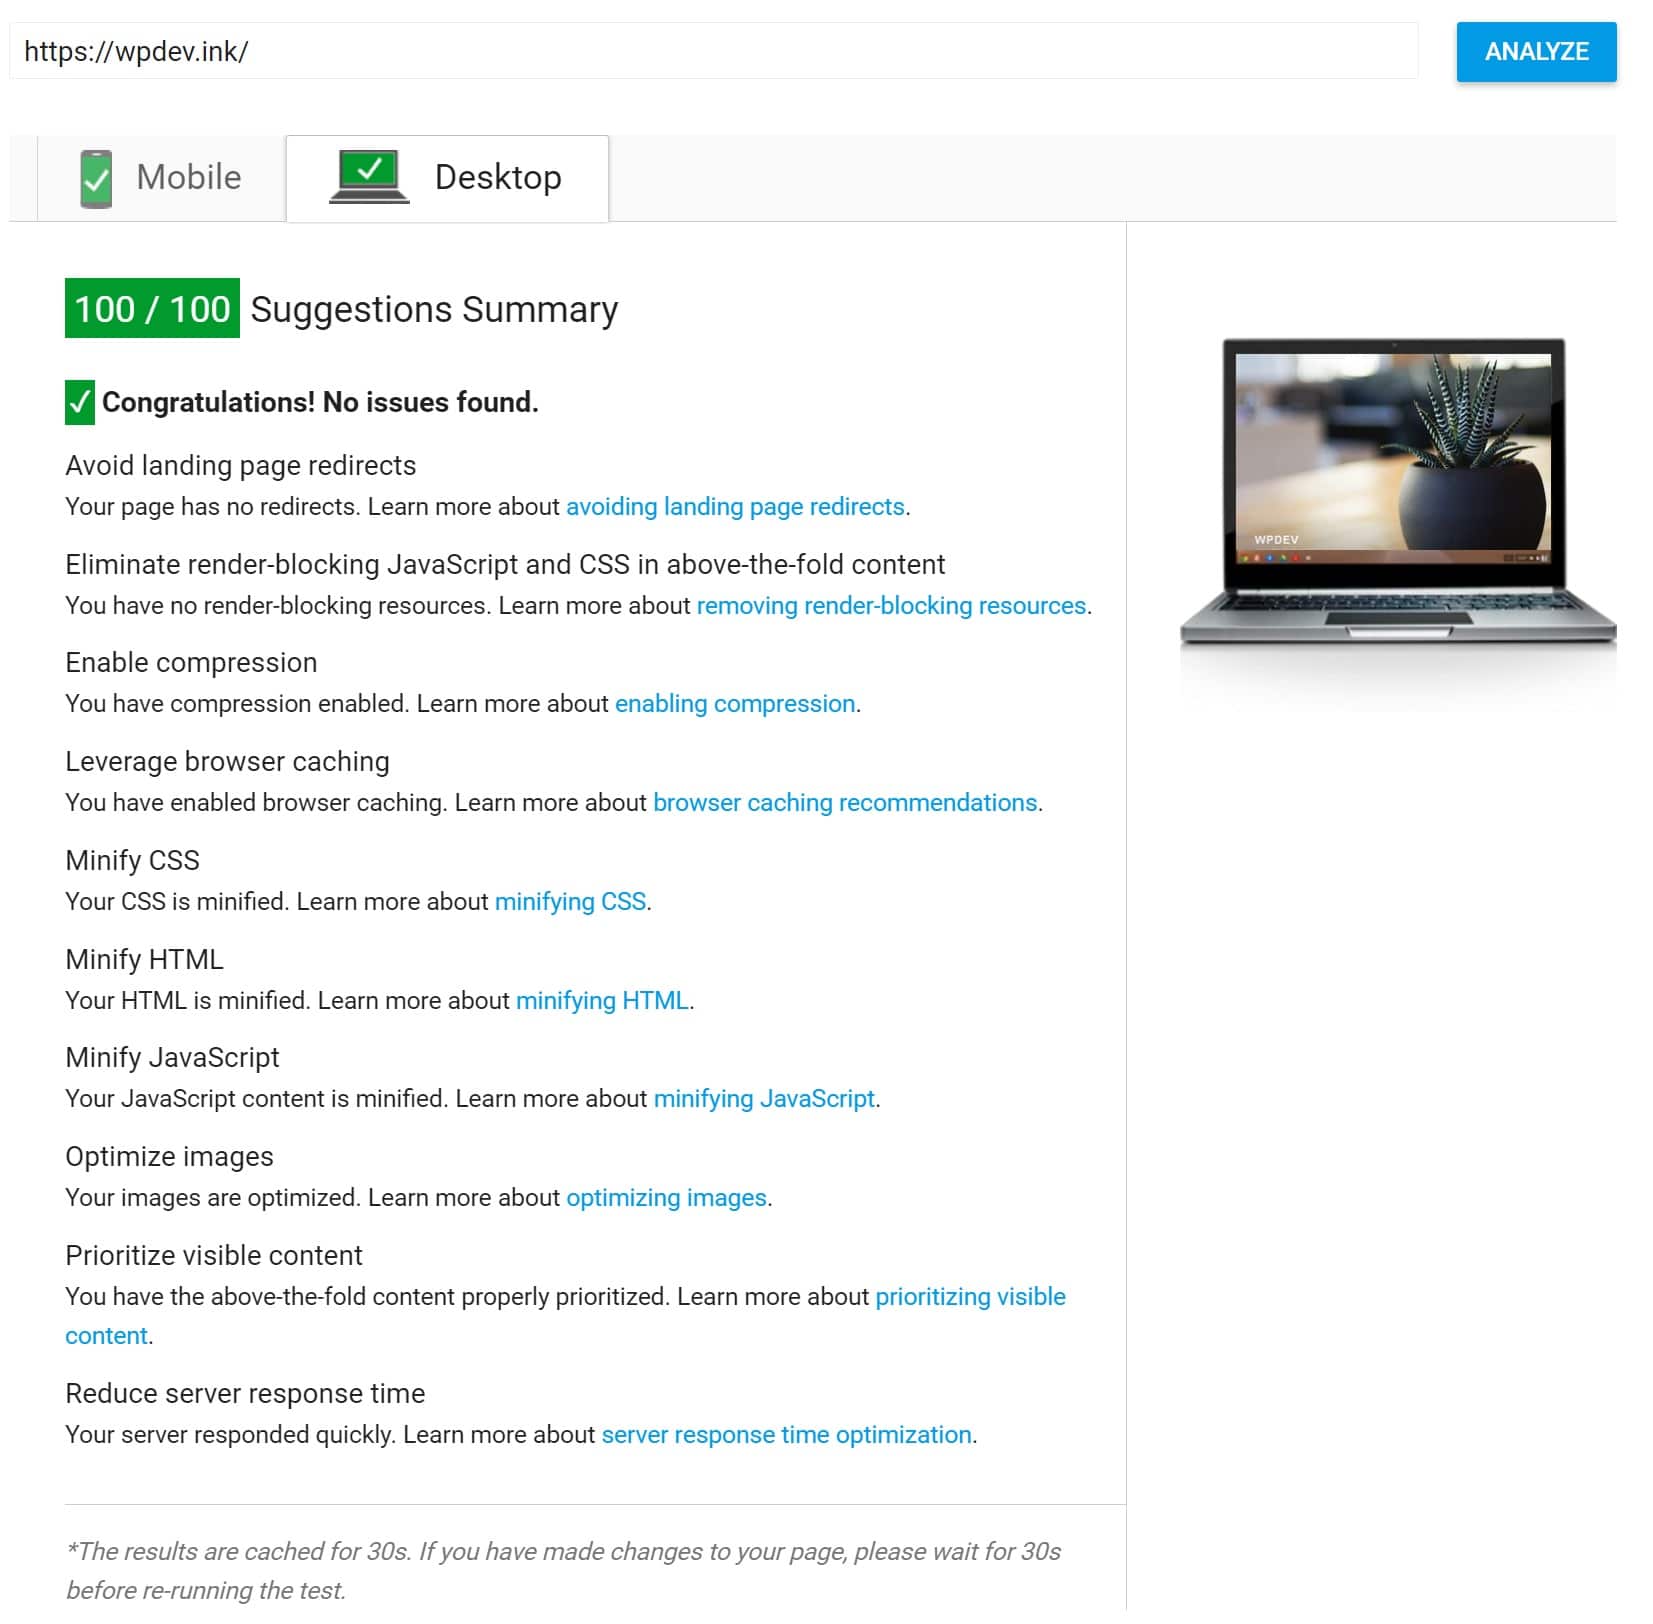
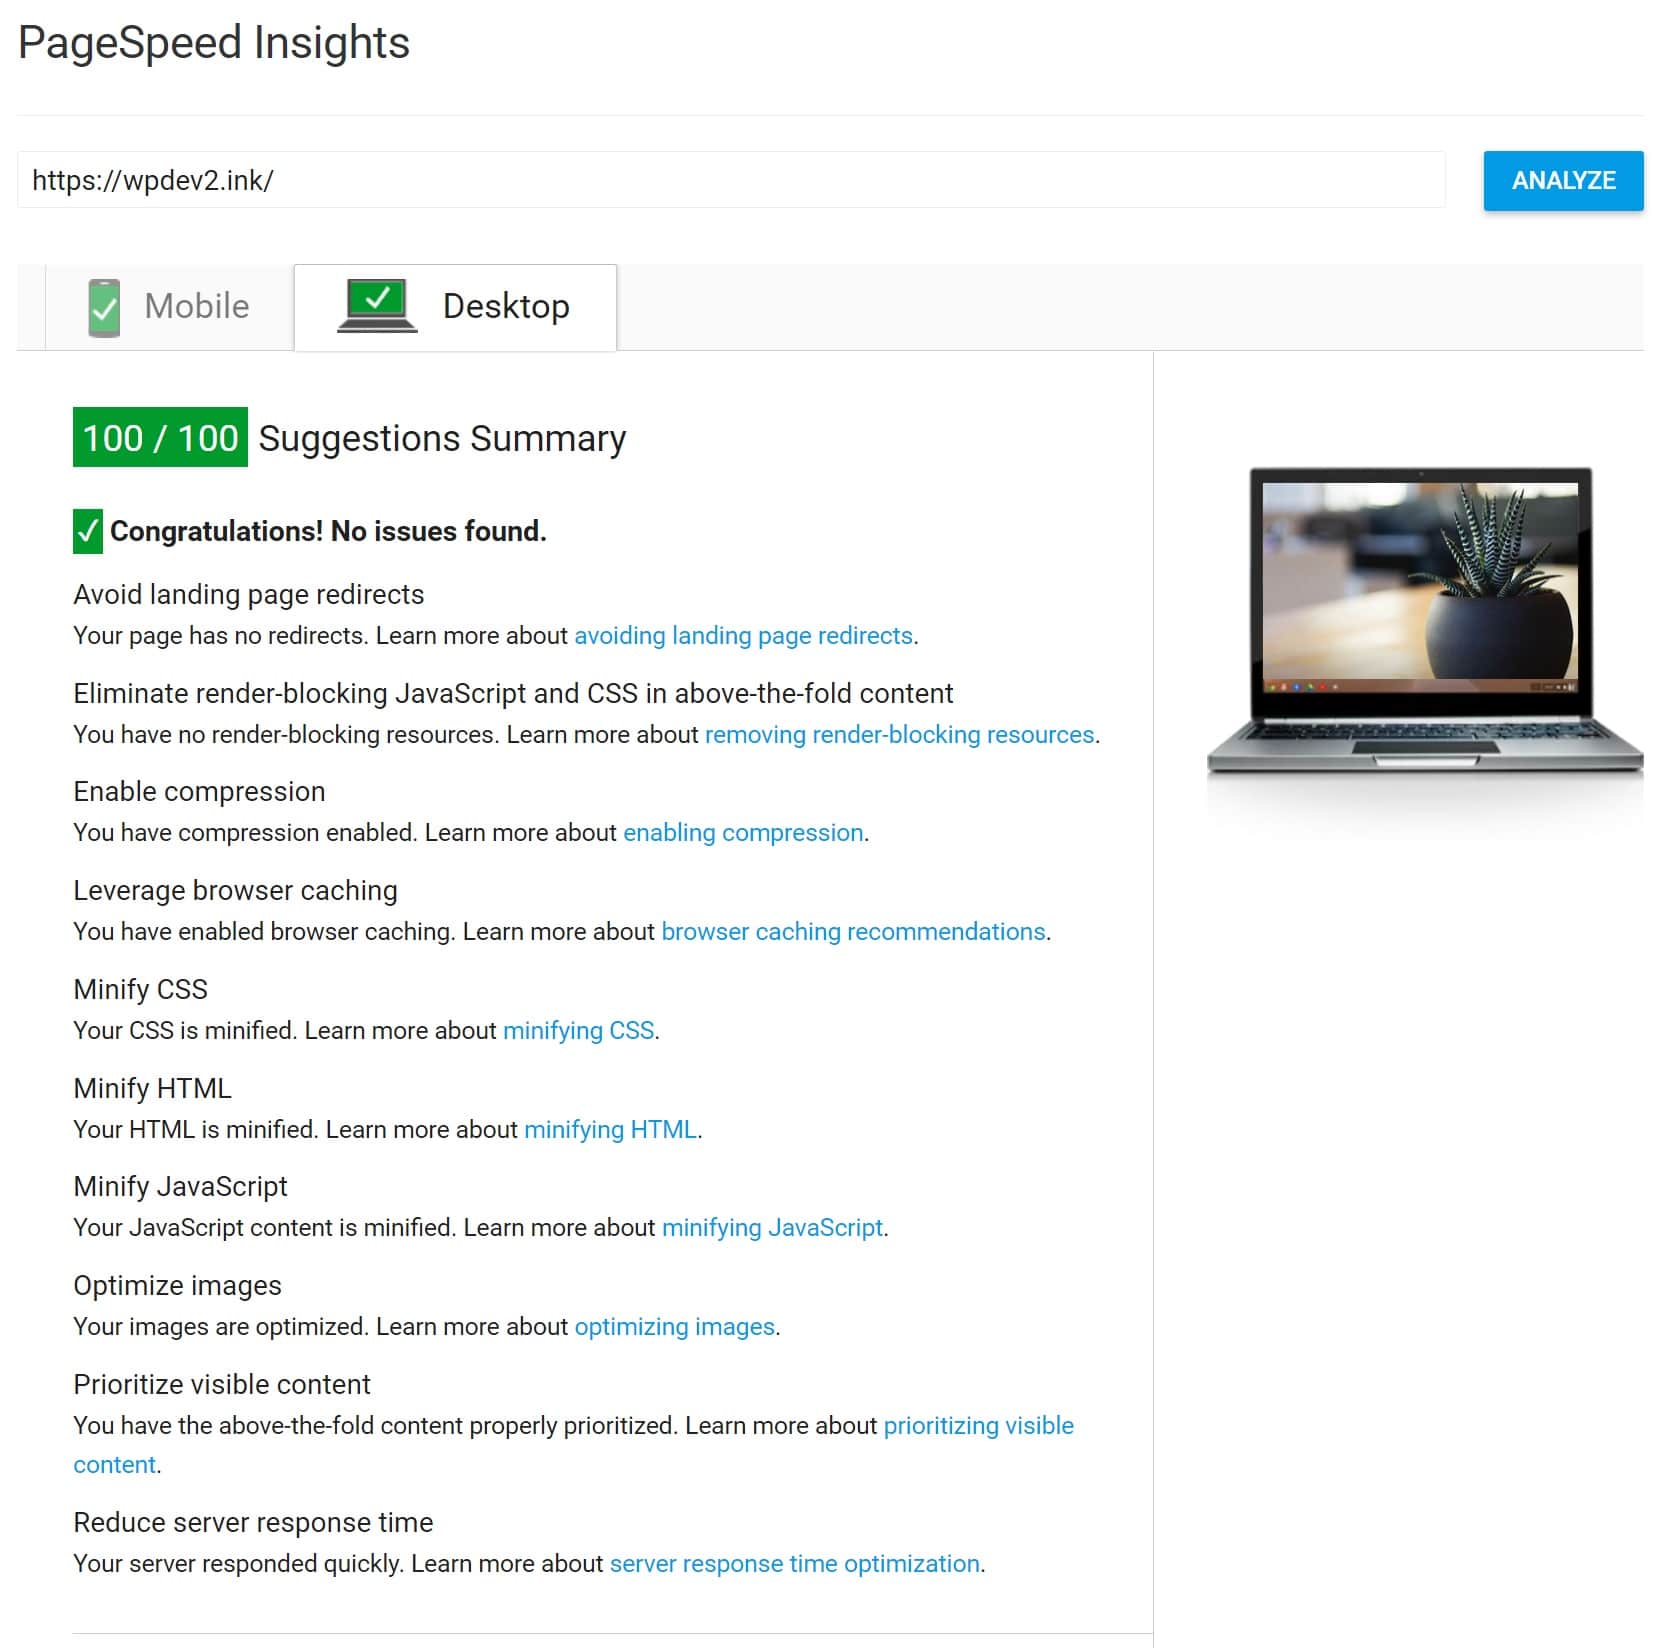
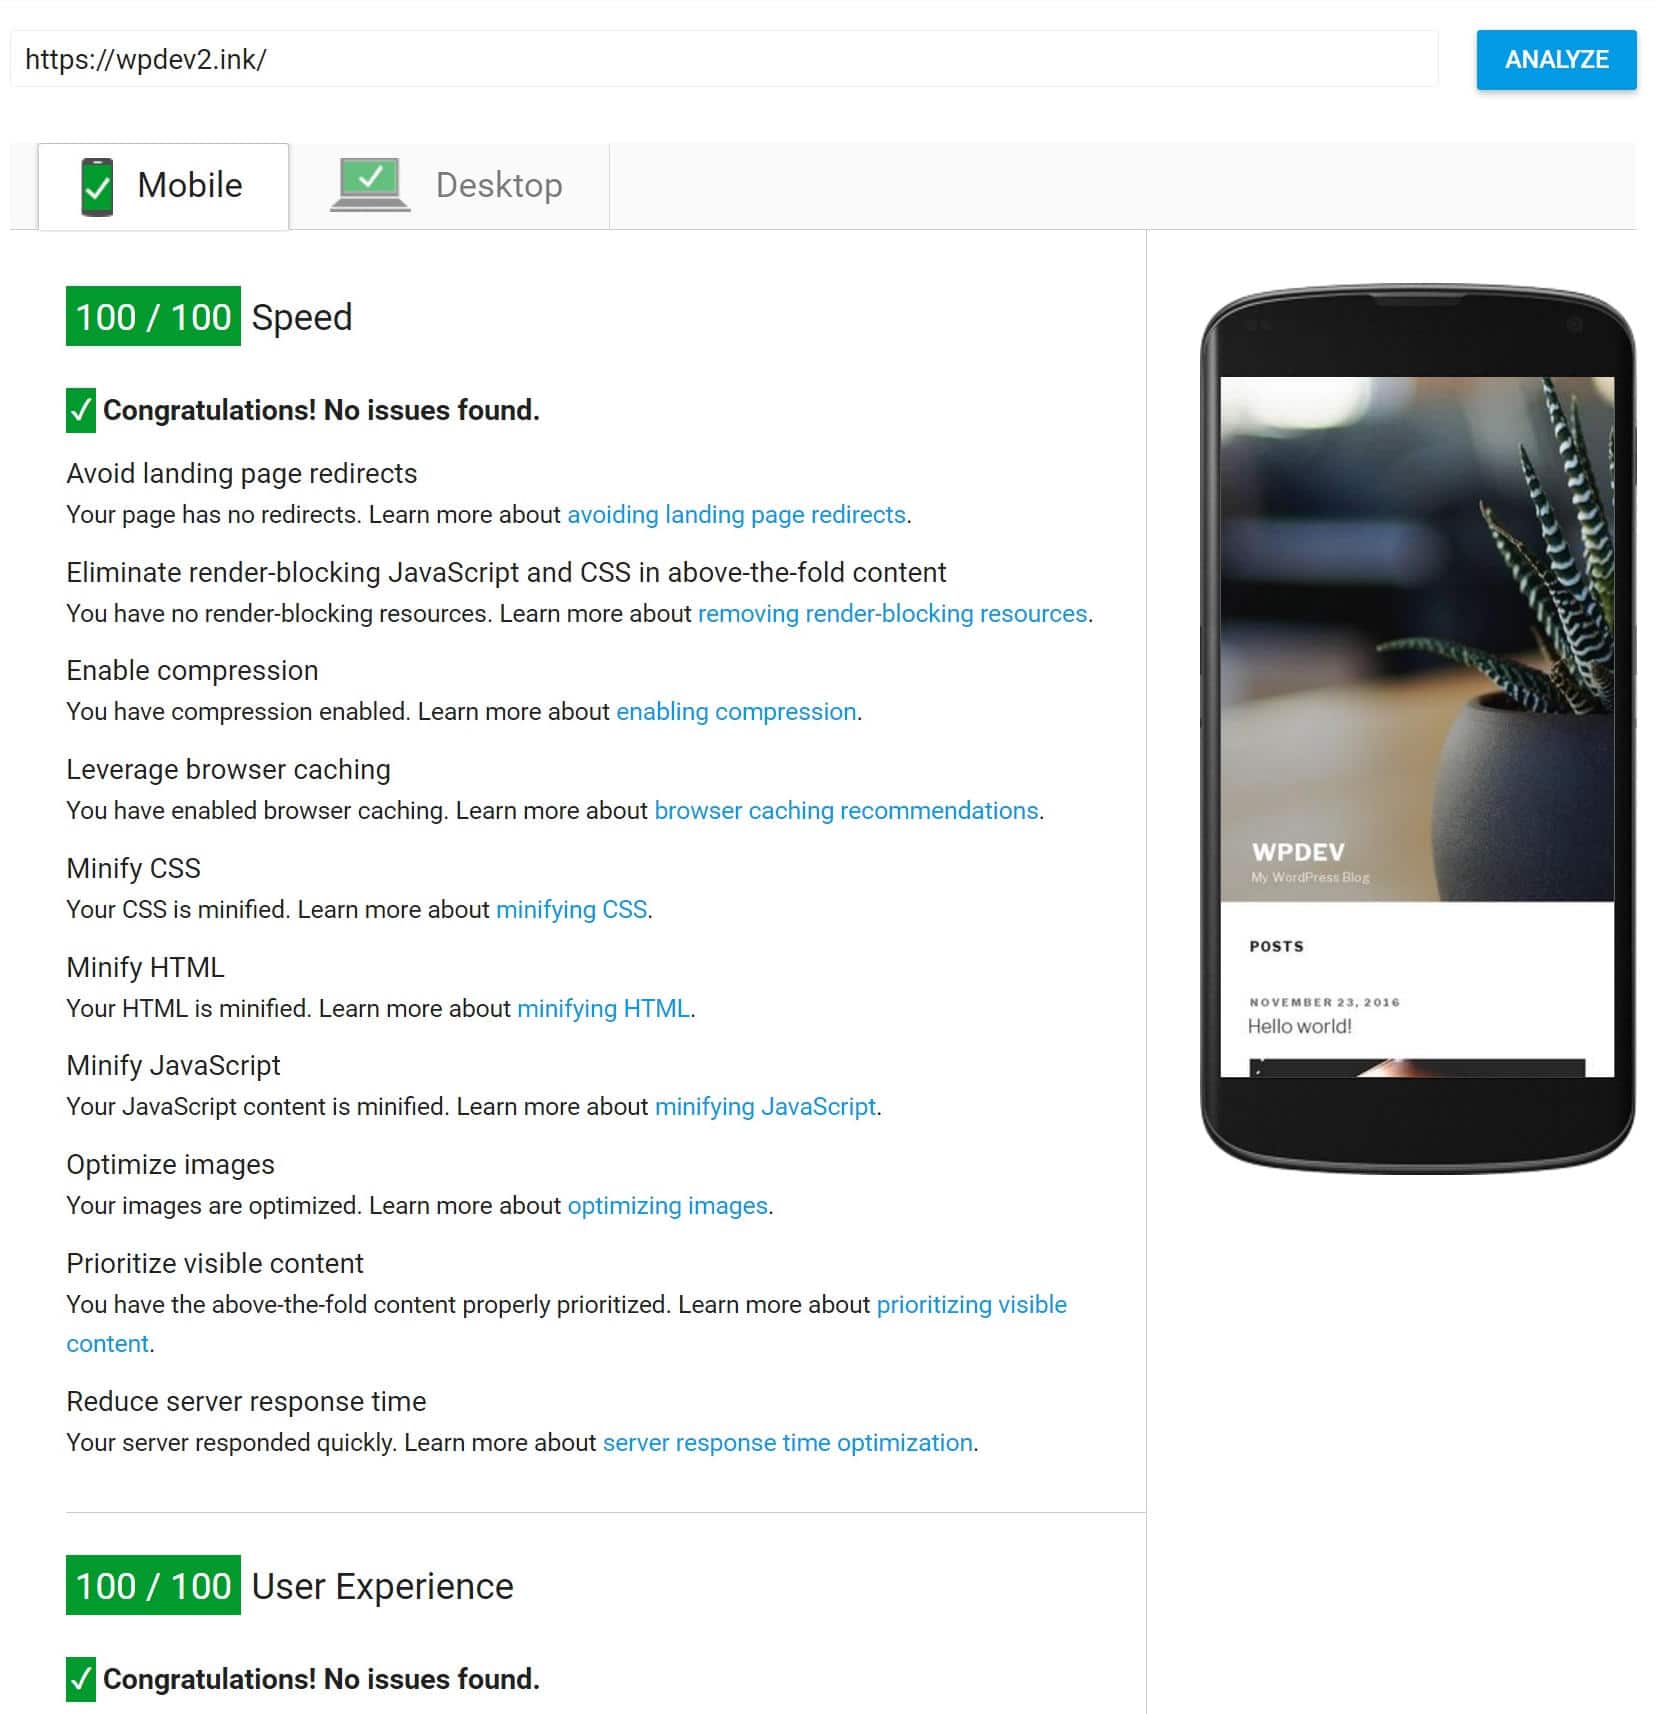
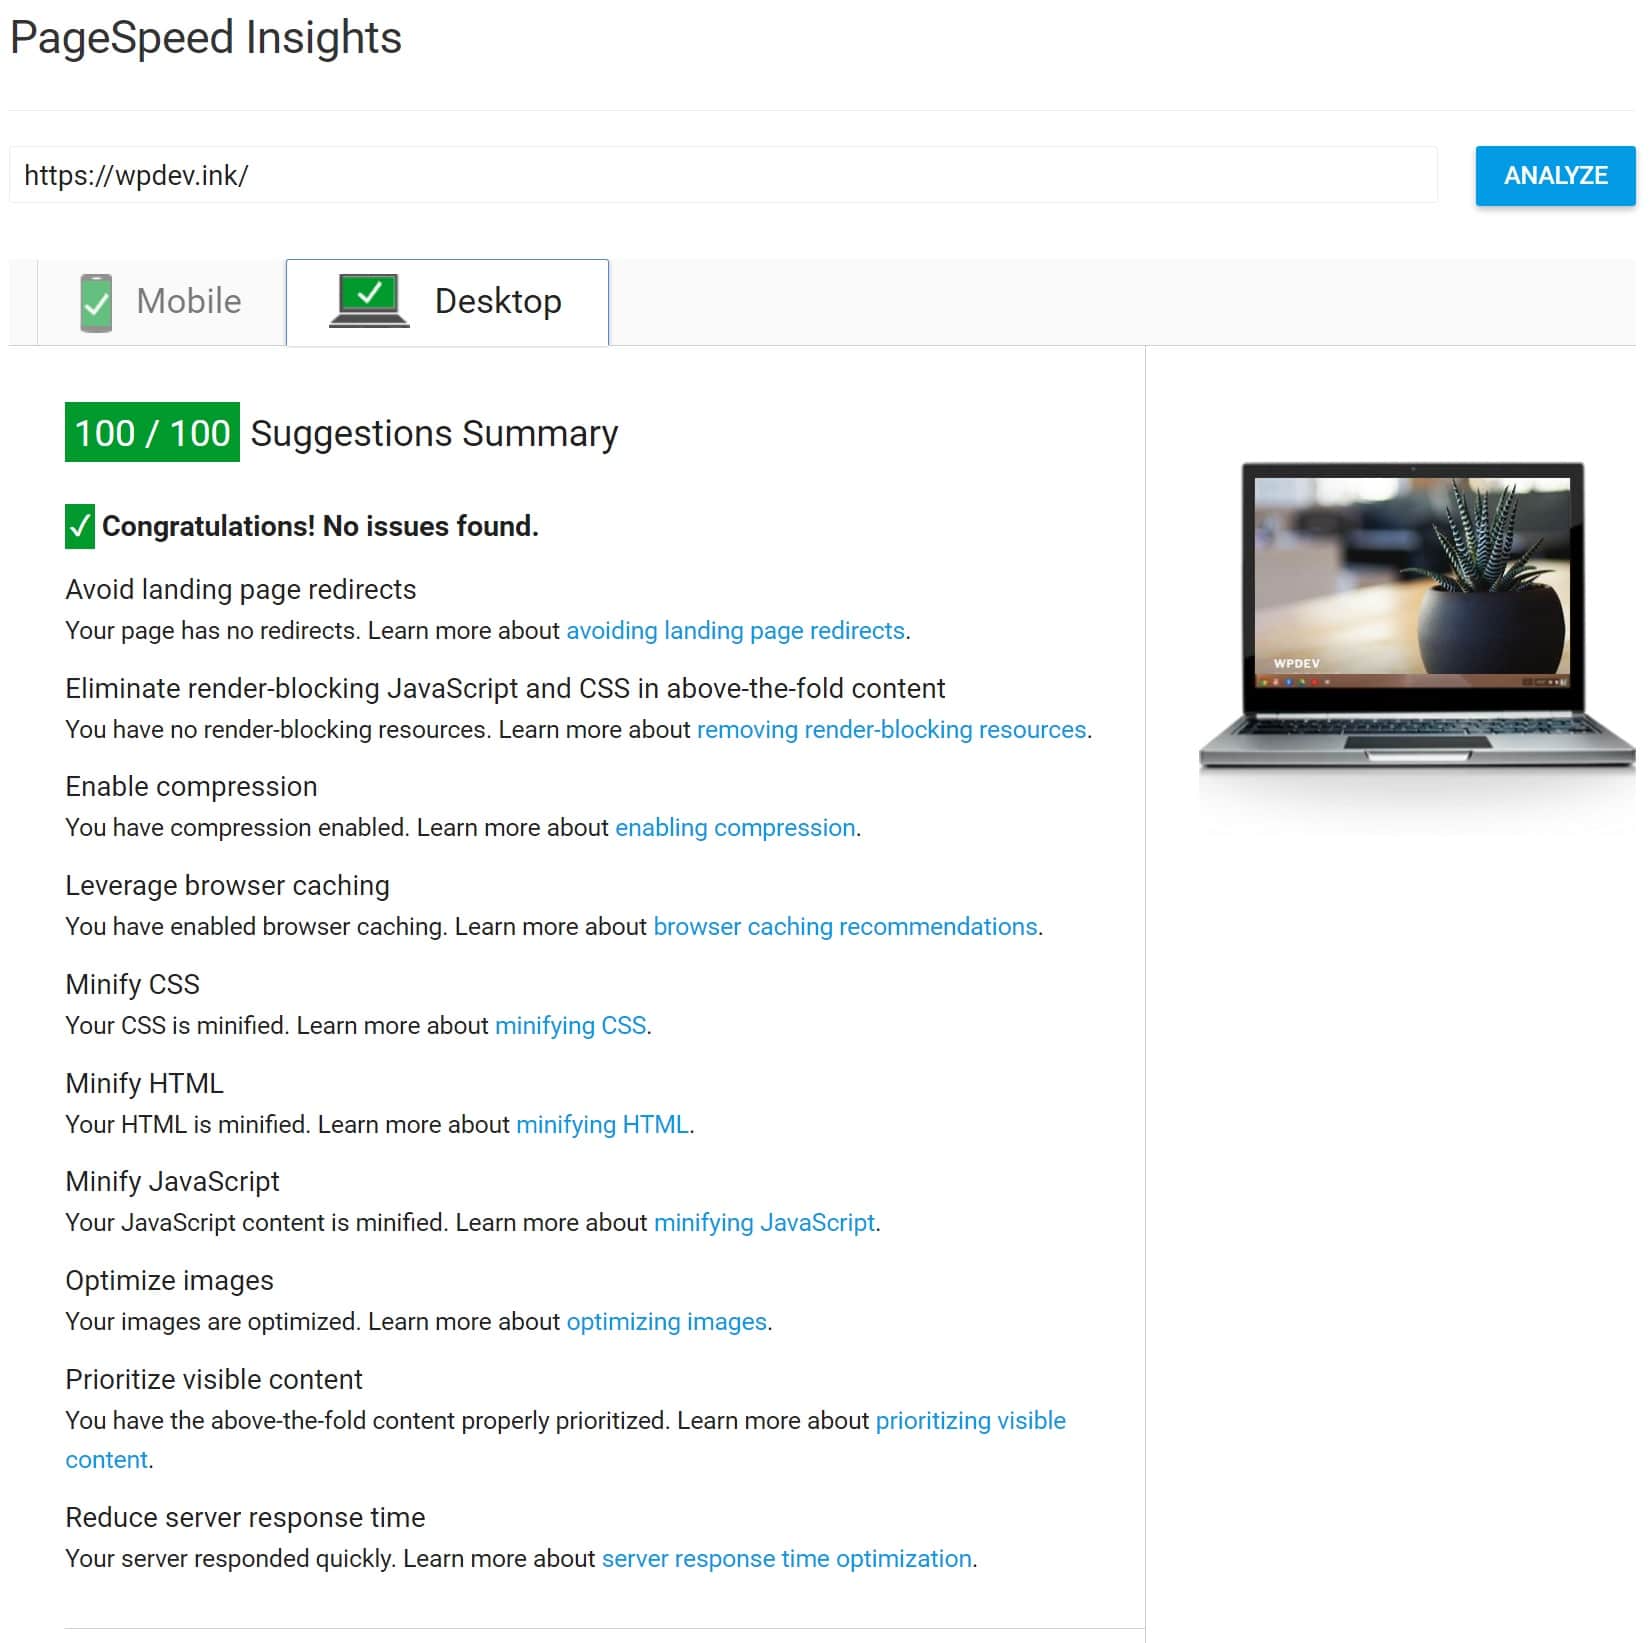
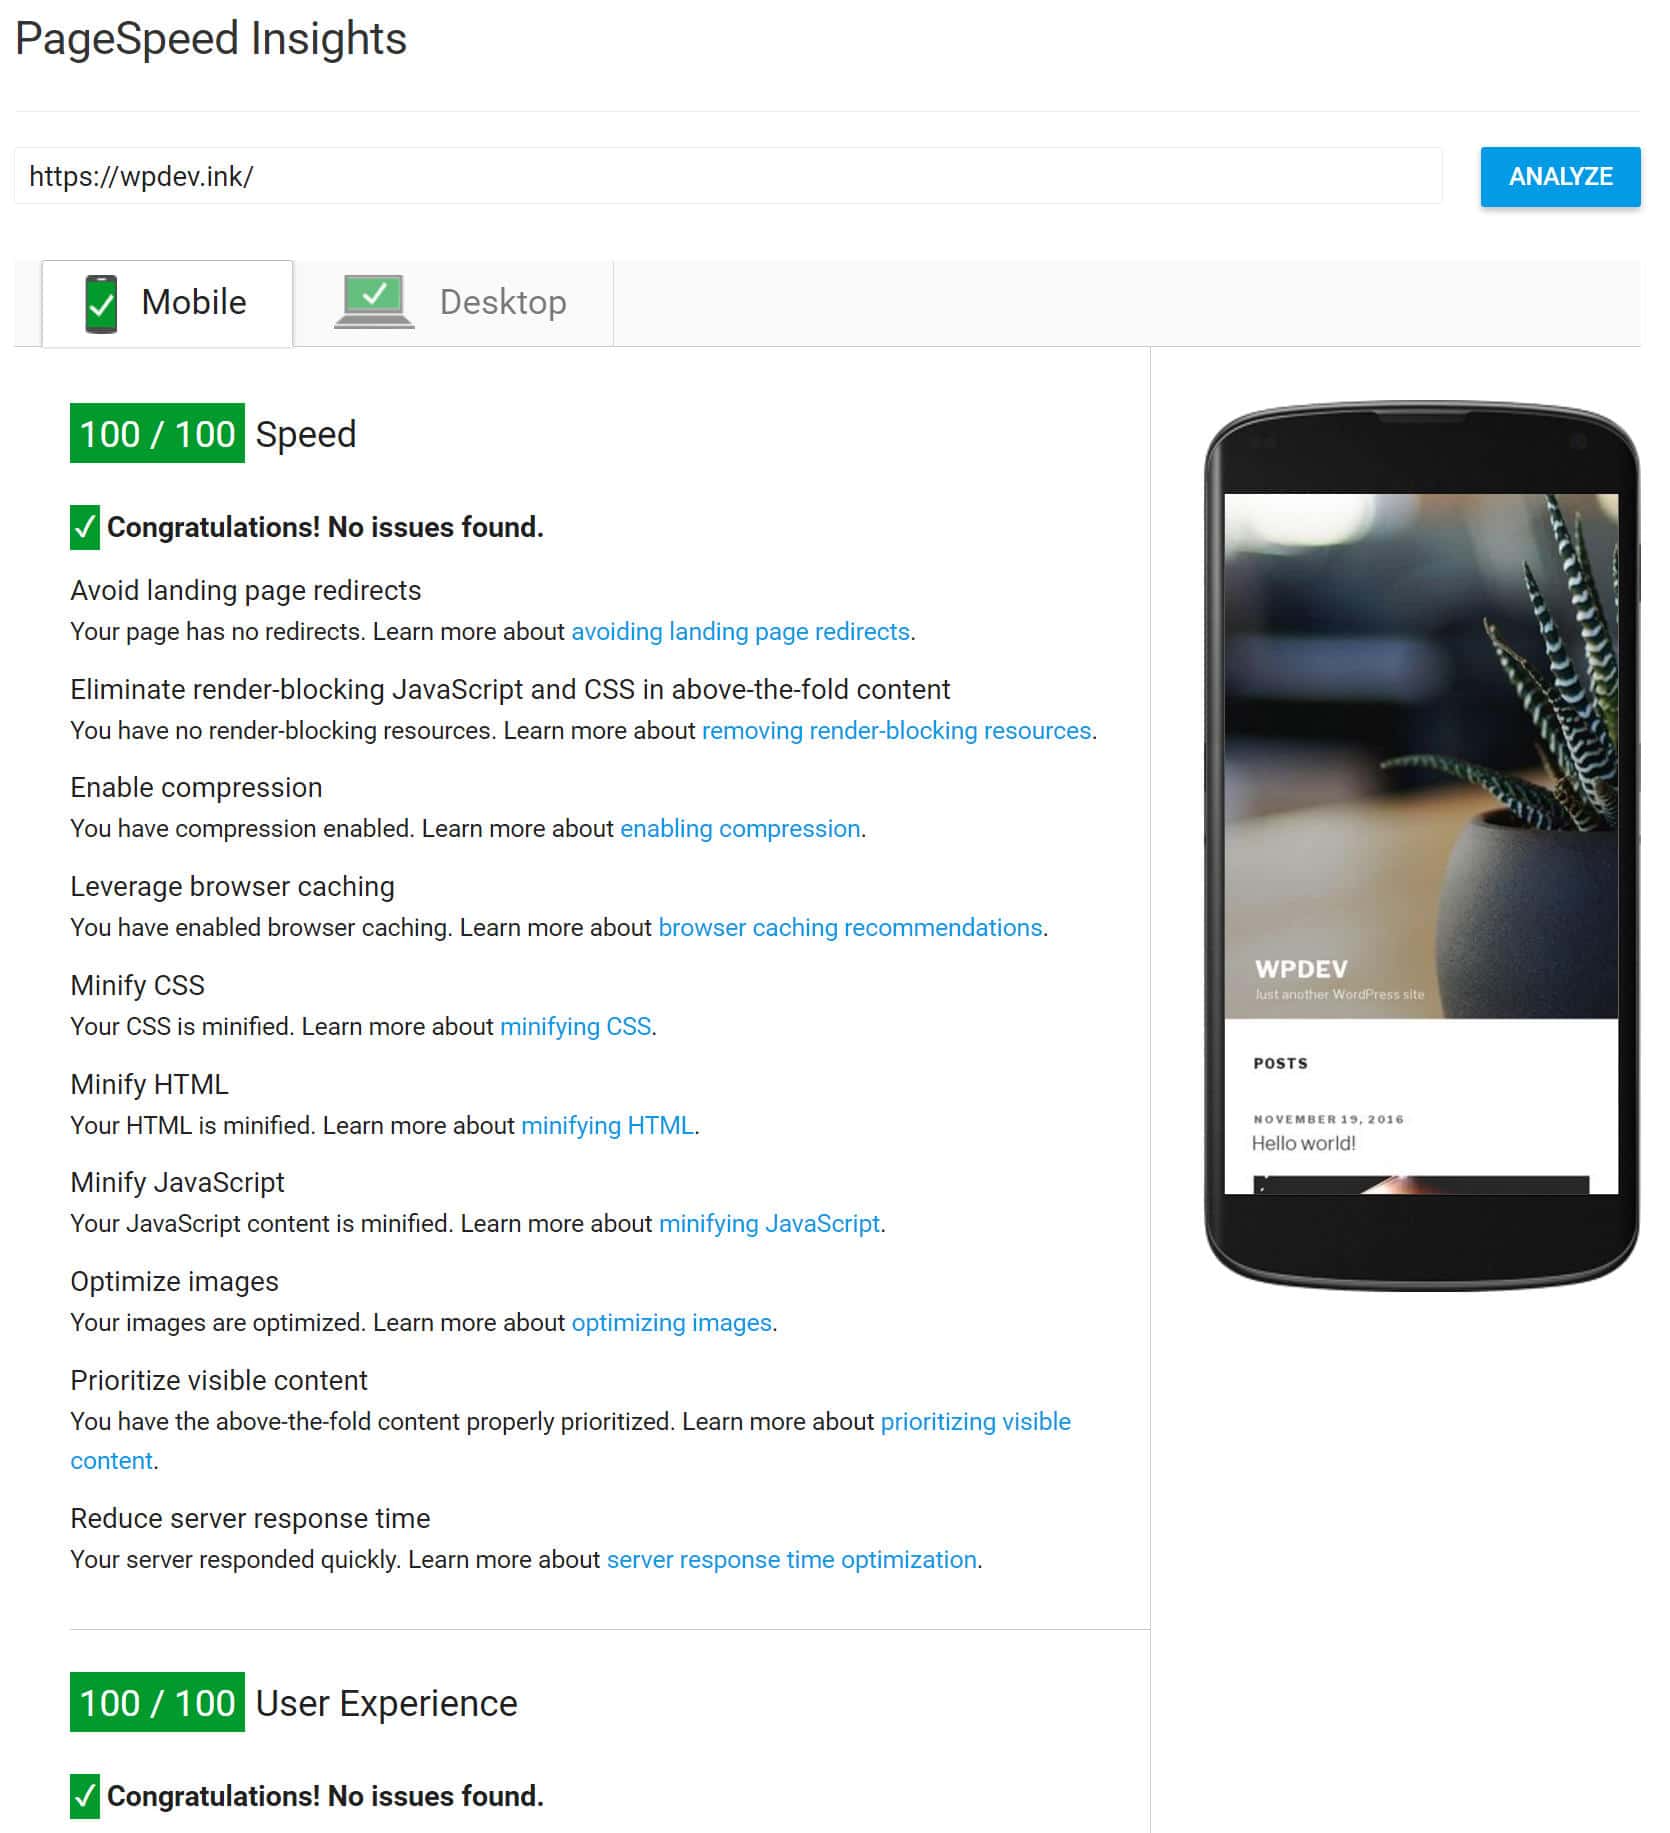
And that’s it! We have now successfully taken the WordPress Twenty Seventeen theme from 69/100 to 100/100 on both mobile and desktop on a low-budget shared host.
Here are the mobile scores. We didn’t have to do anything additional for mobile. Getting the desktop version to 100/100 automatically raised our mobile version and user experience scores to 100/100 as well.
We also have a before and after with speed tests from Pingdom.
Before PageSpeed Insights Optimizations Speed Test
Here is a speed test from Pingdom before any optimizations were done on the shared host.

After PageSpeed Insights Optimizations Speed Test
Here is a speed test from Pingdom after optimizations were done on the shared host.
100/100 in Google PageSpeed Insights with Kinsta
Our second test site is configured the exact same way as the 1st. It is simply on a different domain. We have WordPress 4.7 with the Twenty Seventeen Theme running on our Kinsta servers (NGINX). SSL is configured and the following plugins are installed.
- Yoast SEO
- Akismet
We have Google Analytics running within the <body> of our header.php file. The only modification we have made is we added a featured image to the default dummy “Hello world!” blog post. We run our test site through Google PageSpeed Insights and out of the box, we get a 73/100 desktop score and a 63/100 mobile score. It is important to note that compared to the shared host test site above, there are already a lot of warnings that are fixed out of the box, such as:
- Enable Compression (Kinsta already has Gzip enabled on all servers, no need to enable)
- Reduce server response time (Kinsta is already blazing fast, already well within Google’s acceptable parameters without any optimizations)
- Expires Headers (No need to enable because Kinsta has caching headers enabled at the server-level)
On Kinsta you will want to follow just a few of the same recommendations as before:
- Optimize images
- Eliminate Render-blocking JavaScript and CSS in Above-the-fold Content
- Leverage Browser Caching
- Minify JavaScript
It took us less than half the time to get our site on Kinsta to 100/100 scores because there were simply less steps to begin with.
Here are the mobile scores.
We also have a before and after with speed tests from Pingdom.
Before PageSpeed Insights Optimizations Speed Test
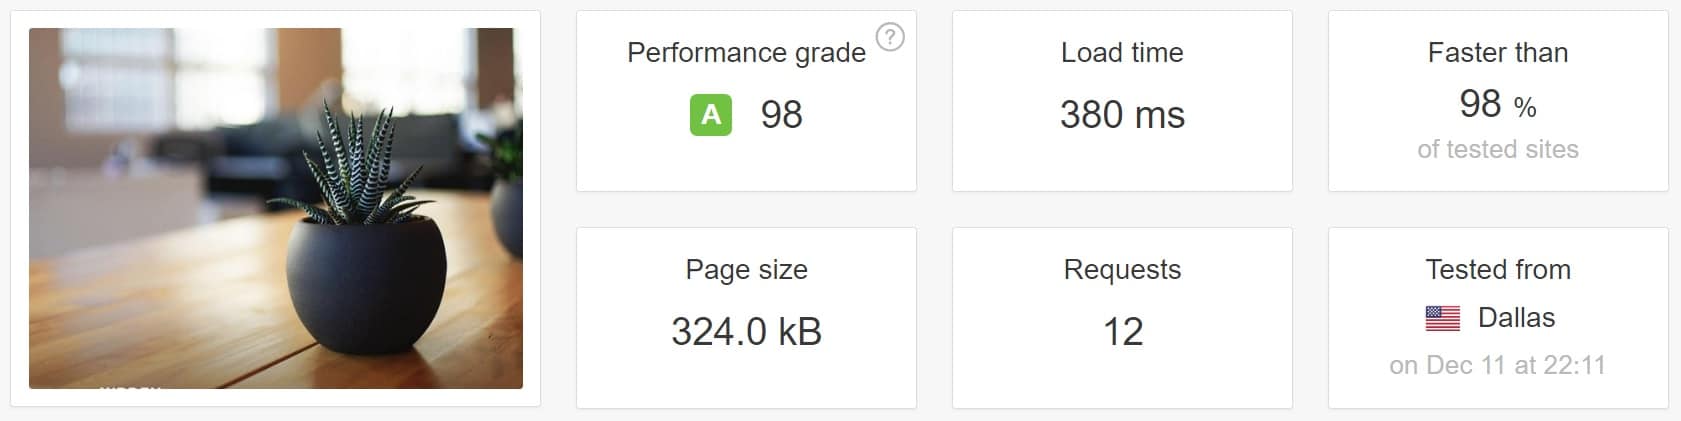
Here is a speed test from Pingdom before any optimizations were done on Kinsta. Notice that the un-optimized site on Kinsta was over 200ms faster than the optimized shared host!

After PageSpeed Insights Optimizations Speed Test
Here is a speed test from Pingdom after optimizations were done on Kinsta.
Additional PageSpeed Improvements
We are simply optimizing for Google PageSpeed Insights in this tutorial. In fact, we could have shaved off more from our load times if we also did the following:
- Remove Query Strings
- Add a CDN to speed up content delivery
- Further optimize our images with even great compression
- Lazy load images
And of course, we have a lot of great additional tips in our beginner’s guide to website speed optimization.
Summary
The point of this tutorial was to better explain and understand what the Google PageSpeed Insights warnings mean and what you can do to fix them. Once you understand these better, you can go about applying some of these strategies to your larger sites. Of course, with big sites you probably won’t ever score that perfect 100/100, which is perfectly OK! Or if you do, it will take some work. We simply recommend implementing what you can and you will most likely see speed improvements. Remember that the speed of your site, along with perceived performance is what really matters. Don’t obsess too much over scores.
It is also important to note the differences above when it comes to shared hosting and Kinsta’s fine-tuned WordPress environment. We are faster out of the box than most shared hosts after optimization. You should ask yourself, how much is your time really worth? If you simply want fast out of the box, Kinsta’s managed hosting environment can do that for you.
The next time a client asks you to improve their scores, you now have some up to date tips on how to do that. And if we missed anything important, just let us know below in the comments. Stay tuned for larger-scale case studies with Google PageSpeed Insights that we will be doing in the future.